January 29, 2012

Mistake Rib Baby Hat

 
Mistake Rib Baby Hat


Errata: 
10-30-2018:  fixed 6-12 month decrease section to align with written stitch count.

Craft Type:
Knitting

Skill Level:
Easy

Sizing:
For sizes 0-3 months (3-6 months, 6-12 months), 12” (13”, 15”) round largest part of hat, unstretched, and 6” (7”, 7.5”) to i-cord tie.

Gauge:
23 stitches and 35 rows = 4” in stockinette stitch

Materials:
  • A lot less than 1 skein of Bernat Softee Baby in Gray Marl (for reference, I managed to to a small baby cardigan and two of these hats out of one skein). If you have about 100-150 yards of another DK weight yarn around, you could use that (and if you don't like acrylic, you won't want to use the yarn I used anyway. It's standard acrylic).
  • US 4 (or whatever you get gauge on), 40” circular needle or longer (for magic looping) or a set of US 4 (or whatever you get gauge on) DPNs (if this is your preferred way of working in the round).
  • Darning Needle

Abbreviations (US terms are used):
CO – Cast On
YO – Yarn Over
K – Knit
P – Purl
K2tog – Knit two together

Notes:
This is done using a 1x1 mistake rib, so it's not reversible.

Instructions surrounded by * symbols indicates repeat sequence until the end of the round. Instructions where there is a number followed by numbers in parenthesizes indicates different numbers or steps for the different sizes. If you only see one number or step, it's for all sizes. If there are different instructions for the brim up or brim down versions, they appear under brackets stating what version in the order 'Brim Down/Brim Up'. If the instructions apply to both, they are started with a set of brackets as such. To note, the main difference is the brim pattern and where to measure the hat from for the body. After that, it's the same.

Instructions:
[Both]:
CO 66 (70, 86) stitches. If using DPNs, spread out stitches evenly across all your needles. If magic looping, split evenly.

Brim:
[Brim Down]:
Round 1: *K, P*
Round 2: *K*
Repeat 1-2 until ribbing is an 1” long.

[Brim Up]:
Round 1: *K, P*
Round 2: *P*
Repeat 1-2 until ribbing is 1.5” long.

Body:
[Both]:
Round 1: For 0-3 month and 6-12 month sizes, K2tog first two stitches, then K to end of round.  For 3-6 month size, just K whole round.

[Brim Down]:
Work in stockinette stitch until hat measures 4.5” (5.5”, 6”) long from CO edge.

[Brim Up]:
Work in stockinette stitch until hat measures 4.5” (5.5”, 6”) long from the start of the stockinette part.

Decrease Rounds:
[Both]:

(For 6-12 month size, start here)
Round 1: *K15, K2tog*
Round 2: *K*

Round 3: *K14, K2tog*
Round 4: *K*

Round 5: *K13, K2tog*
Round 6: *K*

(For 3-6 month size, start here)
Round 7: *K12, K2tog*
Round 8: *K*

(For 0-6 month size, start here)
Round 9: *K11, K2tog*
Round 10: *K*
Round 11: *K10, K2tog*
Round 12: *K*
Round 13: *K9, K2tog*
Round 14: *K*
Round 15: *K8, K2tog*
Round 16: *K*
Round 17: *K7, K2tog*
Round 18: *K*

This should leave you 40 stitches on the needle. If you don't have this amount, please adjust accordingly until you do.

Hat Closure and Poof Top:
[Both]:
Round 1: *K2, YO, K2tog*
Round 2: *K, P*
Round 3: *K*
Repeat 2-3 until ribbing is ½” long. Cast off on round 2 in pattern. Weave in ends.

I-Cord Closure:
[Both]:
Knit a three-stitch, 8” i-cord. If you want more decorative loops, you can make it longer. (If you don't know how to make an i-cord, click here). You can use the same needles as the project, or go down a size or two if you want a skinnier i-cord. Do NOT weave the ends of the yarn into the cord, and make sure at least one end is on the longer side.

Weave the i-cord in and out of the YOs, making sure that both the ends of the i-cord are outside of the hat at the end and are the same length (you may find that putting a darning needle on one of the loose ends makes this a lot easier). Pull tight to shut hat.

Cross the two ends and wrap them around the top of the hat (level with the skinniest part of the poof). Tie ends into a knot on the other side (like the first step of tying a shoe. It doesn't need to be secure, just together.).

Determine which piece of yarn on the ends of your i-cord are longer. Take the shorter one and weave into the i-cord like normal, then tuck the end of the i-cord under the knot, making a small loop on one side. Thread a darning needle on the other piece of yarn, and use it to tuck in the other end of the i-cord under the loop like above. To do this, draw the needle through to the inside of the hat under the knot, making sure to go through the other end of the i-cord already tucked under there, and pull. Then, thread the yarn in and out from inside the hat through the ends of the i-cord and the knot to secure the i-cord and it's ends to the hat. End with yarn inside the hat and weave in the end like a cast off. This should leave tiny loops above and below the i-cord where the knot was placed.

Happy knitting!

* * *

If you find any errors in this project, please e-mail: CompileYarn[at]gmail[dot]com, or leave a comment  here or on Raverly.  Copyright (c) invisican/CompileYarn(). .


January 15, 2012

I Seem to Plan These Things at the Last Minute

So, in true me fashion, I found out last week that Vogue Knitting Live was being held this weekend in Manhattan, and therefore made last minute plans to go.  Which I can do, since I now don't just live close to the city, but now live close enough where attending was just a matter of hopping on the subway.

Unfortunately, having just moved (as well as had some other unforeseen cost sinks) meant I couldn't afford to take any classes, not that there was a good selection the last week of registration anyway. I ended up doing the 'I Heart NY' package, since paying for that cost just as much as paying for two day marketplace pass, and got you a lecture on top of it.  It ended up working out, as I not only went Saturday to attend the lecture as I had planned to in the beginning, but went Sunday to attend one of the free panels as well.  Though, being in the marketplace for two days didn't help my budget much.  But let me start from the beginning here.

In General
At first, I wasn't too sure about this event.  I walked around the marketplace first, saw projects I liked, but not a lot of yarn caught my eye.  Contrasting that to Rhinebeck where I saw tons of yarn I liked, it was a little disheartening at first.  I'm thinking that part of the reason was that I was trying to be more cautious with my money and space (in contrast to Rhinebeck, where I didn't have a budget or space constraints), and therefore only glanced at all the nice cashmere and silk yarns that are at these events.  The other was that the projects I've been thinking of doing were more warmer weather projects, and a lot of the yarn was cold weather stuff (on top of that, none of my project ideas were solid 'I'm doing X' things, which didn't help). The third is that this seems more geared towards the fashion-forward crowd, whereas I'm picky about what I like and it usually isn't popular (for example, I really didn't see any colors I like that wasn't some brand name yarn I can get elsewhere for the same price if I want it).  Also, I was hoping I'd find buttons for my baby sweater, but there were very few button sellers.  I don't think it helped that I've been in a weird mood for unrelated reasons. 

However, there were some interesting thing there.  As I said, I did see a couple of projects on display that I loved as a project, though I wasn't interested in the yarn used.  One of the vendors had a nice shrug with a stockinette body and cabled collar, with mid-length sleeves.  I fell in love with it the first time I saw it.  However, the yarn used was some weird yak/wool blend which wouldn't have worked for when I needed the shrug (I have a event in June that I was thinking of making a shrug for), the color choices didn't thrill me, and the yarn wasn't cheap either.  As far as I could tell, the pattern itself wasn't on sale.  The other projects I saw was just displays of patterns from magazines, and the last thing I need is a magazine subscription.  Something to think about, but nothing to do.  At first this bugged me, but now it doesn't.  I have food for thought, at least.

The Lecture
I scheduled myself to go to the 'Passionate Knitter Takes the Next Step' by Jo Packham, mainly because the time worked for me.  However, having played with this blog and the idea of trying to design more complicated patterns, I was thinking it may be helpful.

Now, don't get me wrong, the talk was interesting and Packham was funny and entertaining.  However, the talk was geared more towards those really trying to break into the industry as writers and entrepreneurs, and so a lot of the advice wasn't useful to me.  I was thinking I would get more advice on blogging, designing, and other quirks in the knitting world as a means to itself, not as a tool to market a brand so one can freelance as a creative person. I blog, design, and otherwise knit because I enjoy it and want to share, not because I'm looking to make it my job or use it to break into another job.  Hell, I think there's one person who actually knows who I am, who also knows I blog about this stuff.  I know there's very few people who know how much I truly lurk in the knitting world (and I mainly lurk.  That's what needs to change first, I think).  I guess if the lecture did anything, it showed me that I'm a lot more out of the knitting world than I was thinking, and that's ok with me.

Fashion Shows and the Panel
I found the fashion shows by accident; I just happen to be walking by when one was going on, and decided to watch.  I didn't think I'd be interested, but it ended up being one of the better things about this event.  I say that despite the fact that I am horrified at the trends coming up in the knitting world.  Maybe that's why I did enjoy it.  Because I'm horrified.

I first caught part of the Trendsetter fashion show.  I've never heard of them before this event, and their line of yarns seem to consist of, what's it called, specialty yarns?  Ribbon yarns, sparkly yarns, bobble yarns, all sorts of demented not-yarn yarns.  I was under the impression that specialty yarns were what they tried to spring on new knitters (I know that my learn-to-knit book had more than enough projects made out of Fun Fur.  Why certain people think fun fur and the like is appropriate for beginners is beyond me).  That they're the yarns big box stores sell to one in a blue moon hobby knitters.  But here they all, bobbles, sparkles, and all that jazz, in projects that models are wearing down the runway at a major knitting event.  I don't think I need to tell you that I've never liked such yarns or styles.  I wasn't happy that they seem to be picking up again, despite the fact that I shouldn't be surprised.  After all, when did those ugly fir vests, boots, and hats start selling in department stores? Last year?

Anyway, I decided to stick around and watch the next show (despite the fact that, at this point, I was tired and hungry).  This show was for Skacel, which is another company I've never heard of.  The good thing is that they didn't overdo the specialty yarns.  The bad thing is it seems like the next knitting trend is modular knitting, at least according to this company.  I'm not a huge fan of the 'bunch of squares put together' look outside of some afghans; it was one of the reasons I've gotten into knitting over crochet for such things.  They didn't change my opinion.  Another trend they used was weird garment shaping.  Now, I'm not automatically against unique shaping, but not like this.  These garments had bat wings, sweaters that looked like bags with cuffs, weird cowls attached to the garment, that kind of thing.  Yes, I like knitting rectangles too, but I rather deal with garment shaping than wear a rectangle.  Again, some of the stuff here was just reflecting store trends that I hate.  Oye.  However, there were a couple of things I didn't mind, and I have to say that swing dress is pretty neat, though I'd probably never wear such a thing if I knit it.

After this show I left to get food and go home.  That would have been the end of my Vogue Knitting Live trip, except I guess I enjoyed see all the bad fashions more than I thought, as I found myself looking at the Sunday schedule and going: 'Oh, I could go see the Vogue Knitting show at 2.'  So, I came back on Sunday in the afternoon to see the what Vogue Knitting was offering.

I have to say, while there was maybe one thing I would actually want to really wear (maybe two, if I modified the second a bit), they were a lot saner than the other shows.  There were several garments I was going: 'Oh, that looks really interesting, I wouldn't mind knitting something like that.' or even 'Hm, I wouldn't do that but that's an interesting idea.'  Of course, there were a couple of things where I went 'What the hell?', mainly a long, weirdly shaped cardigan with a long twisted attached cowl in the front (at least the other garments with cowls in this collection were not attached).  Also, cowls in the summer?  Summer ponchos?  I don't get these trends.

After this was a panel on knitting as a career, which was the second reason I went back on Sunday.  As I thought, it was interesting and amusing to hear the stories of people, some whom I've read their blogs, or just names we all have heard around the knitting world, tell their stories on how they ended up doing it for a living. 

Purchases
Despite wondering around the marketplace for hours on Saturday because nothing really caught my eye, I did end up buying some yarn (of course):


This will be for a baby sweater for that baby I've been making the other things for (which, I should mention, one good thing about this event was all the knitting time I had during and between shows and events.  I got the baby hat done. Also, being surrounded by people knitting during shows was great).  I picked this yarn because it's 1) cotton and 2) wasn't in the classical pastel blue/pink colors and 3) I've never seen a colorway like that red/orange one, and I thought it'll be interesting, especially since I still don't know the baby's gender, and while I'd have no issue putting pink or flair-y things on a boy or blue on a girl, my relatives would.  So, I thought the red/orange combo would be gender neutral enough, in a short-sleeve cardigan with stripes (or maybe with sleeves, not sure yet).

When I went back on Sunday, I had plans to not buy anything else.  Not only did that not work, I also manage to make an ass out of myself.  Here's what happened:

1) As I was walking around the marketplace right before it was set to close, I passed the Knitty City booth. At the Knitty City booth were two knitwear designers with books out, both which I've heard of but never owned their books.  One happens to be a known designer who I: 1) have favorited patterns on Raverly for but never got around to making, 2) have read their blog since they were featured in Brave New Knits, and 3) just released a book I was just looking at on Amazon as something I may be interested in. 
2) I go up to the known designer's table and say 'oh, I was just looking at this book on Amazon', hereby throwing all proper social introductions out the window.  I pick up the book and start looking through it.
3) After some niceties about the book with a Knitty City staffer, I get told that the author of said book is sitting at the table (which I knew).  I go 'Oh, yes, *mumble, mumble, looking at book not people*, I know, I hang around the Internet.'  At this point I then realize that I: 1) failed to maintain proper social etiquette from the get go, 2) didn't make much sense to anyone else but myself, and 3) now sound like some deranged stalker.  Author has smiled at me, but not said anything but hello.  Unsure what to do, I just keep looking at book.
4) Knowing that there was no graceful way out now, I ask how much book is.  Another mistake.  Knitty City employee flips over book and reads price off of back (duh).
5) I ask to buy book, hand book I'm holding to author.  I still haven't bother explaining myself about the internet comment, or saying anything like 'Oh, I've read your blog' or anything to that nature because I'm afraid of sounding more like a crazy idiot.
6) At this point, another person reads my name tag and asks about where I live.  I tell her that I just moved.  Turns out, she lives in the same 'hood and informs me that there are a lot of knitters there and they meet up.  I mention that I 'didn't know that because I didn't find it on the Internet' (why did I say that?), and I live on the other side of the 'hood from the place she was pointing out they meet.  She did at least tell me a Raverly group for knitters in the area. I make mental note to check it out.
7) Author hands book back.  I say thank you at least two times.  Author thanks me.  I look around and bow away from table to pay for book.

So, the end result is that I bought something completely unplanned, and there's a well known designer who may think I'm a complete idiot. Oye.  But, hey, I have a signed knitting book, and the note is very nice despite my, um, behavor.  And there are a couple of patterns in there I would love to do once I get the time and money.


Conclusion
I had fun, believe it or not.  Even it was the 'hey, let's see what absurd thing we can see today' kind of fun.  It also made me think about what I'm doing as a knitter, and where I want to go with my hobby.  That's something I'm still thinking about, though it did lead me to do yesterday's post.  Because, honestly, I know I'm talking to myself right now.  I don't really participate in the knitting world.  I just lurk, and think that's enough.  What this event let me see is that it's not enough.  Even if I sound like an idiot at first, I need to participate more, talk more, share more.  Because, after all, one of the things that attracted me was that there is a 'knitting community'.  That's impressive in its own right.  And I don't have to make it my job to participate, though I have to keep in mind that I am a budding intermediate knitter/crocheter and not a designer, despite the fact that I have two designs on this blog.  They're basic; I haven't done anything yet.  However, the other fact is that I can learn to be a hobby designer, but I can't rush the process or do it alone.  My goal, therefore, is to get to a point where I do have some better designs, and to not get frustrated when my fantastical ideas that I have right now don't work at first.  To sit down and do, instead of dream, and to do for the knitting community.

Also, I hope that for next year, I can afford a class or two.  Because I think one of the better things about this event is the classes, and honestly, they would have helped me a lot more.  But that is life.

Oh, and I do have pictures from the event, but they're on my phone, and I'm not sure if I'm allowed to share them, as most of them are of one of the shows.  Sorry.

January 14, 2012

Guides for Self-Taught Knitters: Avoiding Twisted Stitches

I'm sure we all have that one mistake (or more) we've made while learning to knit, where we look back at it years later when we're more experienced and go 'Holy shit, how the hell did I do that?'  I'm not talking about the mistake you catch a few rows away and decide not to fix, nor the mistake you make when you think you can read the mind of the pattern writer from miles away and therefore read in the pattern directions that happen to not be in the pattern.  No, I'm talking about being oblivious to the fact that you're knitting wrong for a whole year because you never saw anyone knit in person.  That kind of mistake.

Being that it took several tries of Googling this issue before I found out what I was doing wrong, I wish to embarrass myself and show you exactly what I did wrong.  Welcome to the first post in my new series, Guides for Self-Taught Knitters.

The Mistake
Pop quiz: Can you tell the difference between these two hats? (Other than the fact that the top and brim is bigger on one):


If you said: 'Oh, the stockinette stitch on the bottom one looks a bit weird,' or, 'The stockinette is leaning a bit on the bottom one' , you would be correct.  This is more apparent in this close-up (the left hat corresponds to the bottom hat in the picture above):


Notice how in the left hat, the stitches seem to be tighter, with one side sticking out over the other, instead of flat and more open in the right one?  That's because in the left hat, all the knit stitches (which are all the knit-side stitches, since these hats were knit in the round) are twisted. What do I mean by 'twisted'?  Well, first, you need to go to this page to see a schematic of what a knit stitch is supposed to look like.  Notice how all the loops are open, and one row of yarn waves through the loops above and below it?  That's how stockinette should look like, and it how the right side hat was done.  Twisted stitches, on the other hand, are where the 'U' and/or upside down 'U' shapes in the diagram end up not 'U's, but crossed:

Source picture is here.
That red row in my badly 'shopped schematic is what every knit row in that hat on the left side is.  While it still creates the semblance of a 'U' shape, it pulls all the stitches tighter than they should be, which we'll see produces a whole host of unintentional side effects.

The Symptoms
You may be suffering from twisted knit and/or purl stitches if your projects are doing one or more of the following:

1) When you stretch a piece done in stockinette and/or ribbing, the stitches pull closed, not open, and the sides of the stockinette columns look like ladders:

2) Your ribbing sucks.  More specifically, the side in which you are not twisting your stitches (unless you're twisting both your knits and purls, in which you wouldn't have this issue) is gaping wide open, and you can't get it not to do that by knitting tighter.  Also, you have huge ladders between the columns (It'll look a bit like the stretched picture above; but unfortunately, I don't have a good example of this one).
If you want to test this, knit a round in 3x1 ribbing.  It will be obvious.

3) When knitting a raglan round sweater, the increase lines aren't straight.  Instead, it looks like one line is bigger than the other, though when you measure it, it's not:


4) When knitting stockinette in the round, the columns of stitches curve around the tube:


5) Increases and decreases look screwy.
Believe it or not, that top part is just stockinette in the round with standard yoke decreases.

6) The columns of stockinette don't lie flat; there's a definite edge on one side (this will be the side in which the 'leg' of the loop is on top).  See the second picture of this post.

Of course, there may be more here I never ran into.  As well, depending on exactly how you're producing the twisting, or if you're making another mistake on top of it, will change exactly what symptoms you're seeing.


Causes and Corrections
Since there are so may different ways to knit and purl properly, there are so many ways you could be screwing it up to produce the twisted stitches.  There is one constant here, though.  If you're knitting into the front of the loop (otherwise known as the knit stitch, where the needle is placed in the right leg of the loop from left to right), if the left side of the loop is facing the front, you're going to twist your stitch.  If you're knitting into the back of the loop and the right leg is facing you, you will twist your stitch as well.

To tell you how I did it, you first need to read up on the English knitting style, if you're not familiar with the term.  This is one of the two most common styles of knitting in the Western world, and if you learned how to knit out of a book, you most likely learned this method of knitting.

One element of this knitting style is that you use your right hand to wrap or 'throw' the yarn around the right hand needle to create the stitch. Now, pop quiz: which way do you wrap the yarn around the needle in English style?

*cue Jeopardy music*

If you answered 'clockwise', you would be wrong, and you just found the reason all your knit stitches are twisted.  You wrap the yarn counter-clockwise in English style.  Unfortunately, the book I learned out of did not have very clear instructions, as it didn't state this fact.  Then again, this was also the book where I first thought knitting in the back of the loop was how one actually knit, but at least it only took me one project to figure that one out (see this project for an example of that, combined with the twisted stitches issue).

Correcting one's action depends on how one was screwing up in the first place.  To correct the mistake I made, you just need to train yourself to throw the yarn counter-clockwise.  Or, you can do what I did, which was to say 'screw this, I'm learning how to knit continental style.'

On that note, I'm thinking my second guide should be on knitting styles, as the books I've seen tend to say 'this is how you knit' without explaining that there are so many different ways one can knit (and purl) correctly.

December 27, 2011

I Know, I Know...

I actually had a whole post planned revolving my completion of the Bucket and Brims hat remake, since I realized that it would be a perfect segway into my one major mistake when I was learning to knit, but then life got in the way.  I'll still get around to that post, but it's not going to happen any time soon.  Sorry about that.

Quick updates: I did get all the hats I needed to done for the holidays, and the recipients liked them, so that's a good thing.  I'm currently finishing up my first baby sweater for this other baby on the bus right now (sorry, don't have a picture).  I should be done tomorrow (minus the buttons...which will have to wait because I have a ban on myself from buying any craft stuff right now).  I did change the sleeve length to short sleeves since this is supposed to be a late spring baby in an area of the country that gets pretty hot. 

Then I'll have nothing to do on the bus for the rest of the week.  Then I won't need it.  That's all I'm going to say for now.  I'll try to get back to really posting when my life settles down. 

A belated happy holidays to everyone, and have a happy new year.

December 2, 2011

Hats, Hats, and More Hats

I've gotten back into my pre-winter hat kick.  Yep, I know winter's coming when I start wanting to make hats.  I did this last year too, so I guess it's going to be a thing with me.  Winter's coming, time to make hats.

Last year, it was motivated by the fact that I had one slightly-too-big hat and scarf set, and another scarf.  I needed more hats and scarves so I didn't freeze my...um, head off when I started walking part of my commute.  This year, it's been quick presents.  Well, mostly.

I first blame my mother.  She wanted an alpaca hat for Hanukkah.  She sprung it on me a couple of months ago, so I was able to plan, get the yarn, and make the hat.  It also helped that she choose a really quick knit:


The pattern is the ever popular Thorpe, using Cascade Yarns Baby Alpaca Chunky, in a size large...which ended up being a little too big when I washed the hat.  Should have dropped down a needle size and/or done the medium so it wouldn't end up so floppy and loose.  Didn't think about the fact that I made it with alpaca, not wool.  It still works and fits well enough, though.

So, of course, that got me thinking and motivated, which is dangerous when you're making a KnitPicks order and you need to spend some more money to get free shipping.  You start thinking things like: 'Hey,  I can make a hat in less than a week...hey, why don't I make one for another relative I have no clue what I'm going to get for him, and oh, how about one for myself. ' I therefore present hat number one (the present):


...And hat number two (mine, still got to finish it):


Hat number one is Lorne's Hat, from the ever-amusing Stephanie Pearl-McPhee.  Simple, straightfoward, nice hat pattern, if it wasn't for the 12in of ribbing in sports weight yarn it requires.  Good thing I like the look of the hat.  All that ribbing got tedious after awhile.  The yarn is KnitPicks Andean Treasure, which I have never used before nor read any reviews before getting.  It's not a bad yarn, but it's KnitPicks, so it's not the highest quality.  It sheds a bit when you're working with it.  However, it is also soft and pet-able, so it has that going for it.  Haven't introduced it to water yet, so I dunno what happens there (I also didn't swatch, so I'll have to make a swatch to test that bit out, he he).

Hat number two is a Bucket and Brims Hat.  I made this hat last year (you can see it here), and screwed it up a bit.  Not only was I still twisting all my knit stitches at the time, but I misinterpreted the pattern.  Which you need to do, since it's not the most straightforward pattern out there.  Doable, but not very clearly written.  It didn't stop me from wearing the first one, but I decided to try my hand at it again and see if I could make a better one.  The yarn is KnitPicks Wool of the Andes Bulky, which I decided to try just to see how the Wool of the Andes line is (the first one was made out of KnitPicks Swish Bulky, but they upped the price on that line and I was trying not to spend too much money).  Not overly impressed with the wool, but it's not bad.  It's not soft, but it's hearty and swishy...it's hard to explain.

This would have been the end of the KnitPicks yarn buying and hat making, except that I ran out of yarn for hat one before I was done (this is what happens when you pick the pattern out after you buy the yarn and don't look at the yardage required).  That's actually the only reason the second hat got started; I needed another project to take on the bus while I was waiting for the extra skein of yarn to be delivered.  But that also led to this:


More yarn for another hat.  This will be for my brother, though he doesn't know he's getting it, so it's another surprise knit.  The colors are intentional (can you guess what it represents?); but that also lead to me buying a skein of KnitPicks Swish Worsted for the yellow (the main color) skein, and Wool of the Andes Worsted for the other two colors (which will be accent stripes, so the fact that the yarn feels a lot rougher shouldn't be an issue).  I'm planning to use this pattern here.  Hopefully, it doesn't take me as long as the last present hat, and hopefully I won't need another skein of the yellow yarn.  That would suck.  I already had accepted the fact that I had to pay shipping for this order, since there was no way I was hitting $50 on my second order of the month.  Oye.

At least Hanukkah starts December 20th this year.  It would of sucked if it started, say, now.  Or maybe it wouldn't have, since I would have already had a present for said brother, and so wouldn't have had this zany scheme, and since the other present hat is a Christmas present, it would have still worked out.  Or something like that.

And after this?  Baby knitting.  Can't do any more hats or scarves, though I would like to make another short scarf for myself at some point...and a cardigan...and a sweater...and I have way too many projects I want to do...

November 15, 2011

The Milk Maiden Write-and-Dash

Since I can't seem to actually sit down and write something when I have time on the weekends, here's the promised notes from my experience with making the Milk Maiden pullover, plus some other observations.

The Sweater
Well, it was an interesting knit.  It came out nicely, but I ended up winging a lot of little changes, despite the fact that I actually took the time to sit down and plan out how I was going to shorten this sweater.  This is because it has an odd construction in the sleeve area and is shaped.  I don't have much of an issue with shaping.  I was worried about screwing up the sleeve construction, having never done something like it before (it involves doing half the sleeve, and then attaching the sleeve to the sweater by decreases, which creates the sleeve cap.  It also means that the sleeve width is the height of the sleeve, something I figured out a tad too late).  However, I did manage to get the sleeves on mostly right.  Yay me.

Oh, and while I was stupid and didn't write every change I made down, I did get a good chunk of them onto my Raverly for this project (the details may be a little lacking, but heh).  But since I'm being lazy, I'm not linking.  My profile link's on the side bar if you're really interested.

The Yarn Used
Madelinetosh yarn....oh, I love your colors, I love the way the color looks in this sweater, but you bleed, and bleed, and bleed!  I set you in vinegar three times, I put so much into the water that it had to be half vinegar, but every time I took you out of the vinegar, you still bled!  How do I set your pretty colors?  How?  Three times I've had to block projects made out of you, and all three times I couldn't stop the yarn from bleeding. Oye.

Other Observations
1) I actually saw someone knitting on the subway a week or so ago.  I've never actually seen someone else knit in public, and here was this woman sitting on the crowded subway, merrily knitting away.  I tried taking a sneaky picture (yeah, I know, it's a little creepy), but the camera in my phone sucks and the subway was too crowded.  (I should note that I don't knit on the subway since I have a very short ride on it).

2) I then finished a hat (it is a present) and a short scarf (probably will be a present) with the alpaca from Rhinebeck.  I now have another hat to do (another present), maybe another project that will also be a present, and a bunch of baby stuff since I now have another relative that's expecting.  I would usually be 'yay' happy about the baby stuff, but I was kind of hoping to start on a cardigan for myself.  You know, so I stop wearing the same store-bought one to work every day.  Oh well.  It'll give me a chance to clear out some of the baby yarn in my stash, given that I'm not over-estimating my knitting abilities again (Which I am.  Can I really do two sweaters after a hat and [retracted] before buying some nicer yarn to make a nicer baby sweater?).

3) I really want to know where the phrase 'sharpen your knitting needles' came from.  My mom said it to me when announcing the baby news.  I've never heard that before, and I've never heard of being able to sharpen your needles.  Probably because I use metal ones.  A web search for another day.

November 6, 2011

Knitting vs Crochet, Part 1: Tools and Notions

For my first serious post, I'm going to start a series comparing knitting (which is what I mostly do now) and crochet (my first love).  This one will be about the tools requires for the trade, and how they compare to each other.  And I have pictures, since earlier today I decided to re-organize all my craft tools.

But first, I would like to announce that I finished this:


I'll go over my final thoughts on it in a write-and-dash post later.  Now, to the comparison.

Knitting

To knit one simple project, you really only need two needles of the correct size. You may also need something like a stitch marker or a counter, but I won't count those because you need them for both crafts.  That's it.  Simple, right?

Nope.  Not in the slightest.  One of the more shocking things to me about knitting was how may damn needles you need to do all the projects you want to do.  Want to knit a sweater?  Depending on the sweater, you may be able to get away with a set of straight needles in the correct diameter (if knit flat or a cardigan), or you may need one or a couple of circular needles in the correct size and length, and a set of DPNs or longer circular needle to do the sleeves.  If it has ribbing, you usually need another set of needles a size down.  If you do hats, you usually use 16" circulars and DPNs, or a longer circular to Magic Loop the whole hat, presuming the hat's worked in the round.  For socks, you'll need tiny DPNs or long circulars that you most likely wouldn't be using for other projects. I could go on and on.  The thing is, if you knit anything and everything like me (well, not everything. I haven't gotten to socks yet since I don't usually like to wear them, but I will eventually) in any and all yarn weights (I've knitted everything from super bulky to light fingering), you end up needing a lot of different needles.  If you're a person who prefers straight needles (not me), you're going to need a whole set of straights, a whole set of DPNs, and some circulars for those random projects that need to be knitted in large rounds.  If you like circulars like me, you maybe could get away with less needles, assuming you prefer magic loop as well and don't buy a whole set of DPNs before you realize that.

That's the other thing, though.  If you're new, you're usually directed to the straight, cheapo needles and set to go (unless, of course, you learned from someone who preferred differently and/or knew better).  That's what I started on, having learned out of a book bought at a big-box craft store.  Then, if you expand your horizons beyond scarfs, you'll mostly likely find your way to DPNs and circulars when needed.  If you don't hate circulars and/or don't absolutely love and can't deal without straight needles or just prefer circulars, you would be smart to sit back, realize that in order to do all the things you want to do, you'd need to buy not only a different size needle, but 3-5 different lengths for the circulars, so it'd make sense to invest in a interchangeable set now, before you buy all those needles.  You'd be really smart to realize that you prefer magic loop before you buy all the DPNs, but hey, it's the price I pay for learning without another knitter around.

Anyway, here's all my current tools:


I was lucky and realized I preferred circulars and things knitted in the round early, so I went and bought the interchangeable set from KnitPicks, which definitely has saved me money and kept my needle count down.  I chose this one because I prefer metal needles and decent prices, and the other two metal sets in existence didn't fit both criteria (Boye's is cheap, both in price and quality, and the other one (I'm blanking on the brand) was more expensive for less sizes).  I've had a couple of issues with the cables popping out of the metal screw top, and needles becoming unscrewed despite being tightened, but nothing major or constant (and KnitPicks did replace a cable for free when it broke on me the first time I used it.  They're pretty good about that).  And I have to say, I love the sharp points.  My right index finger will beg to differ, but that's all right.

Oh, and I still need more needles if I ever get around to that sock, since the smallest interchangeable head is a US 4, and I don't own a solid US 0, 1, or 2 in a length above 24".

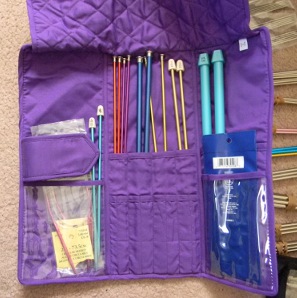
Also note the notions in the right hand corner.  Needle caps, cable needles, stitch holders...all notions unique to knitting.  Even with the interchangeable set keeping some of the cost down, I'd have to say that all those tools in that picture are worth around $200 US dollars (still need to actually tally it).  Not counting the purple holder at the bottom, which has the straights I bought before I went circular and interchangeable:


That's probably another $40-$50 there.


Crochet

So, what do you need to crochet anything and everything?  This:


That's it.  Well, it's not all the crochet hook sizes you can get (I don't own my own Q or M hook, nor all the 'steel' ones), and I managed to lose my G hook when it fell out of a hole in the plastic bag I had a project it (which, ironically, was a knitting project.  I was carrying it around to pick up stitches if I needed to), but that's all the crochet hooks I've ever used.  I've crocheted everything from super bulky yarn to crochet thread as well, so it's a good range.  That whole thing cost me around $40.  If I got the rest of the set, it would cost me around $60-$70.  Of course, this presumes you get the same hooks I did, which the cheap Boye ones (which are fine since I prefer metal hooks, and all a crochet hook has to do is hook the yarn through a loop.  I also prefer the hook shape on the Boye's; there's another cheap brand that does a different style hook, and I don't like it.  That's probably what the green, extra K hook I have on the left is.  I never use that hook).  If you go to a mid-upper-level style of hook, it may cost more more like $100 (though I just looked, and you can even get a Clover soft set for $40, though you may  need a couple extra sizes).

Conclusion

So, in terms of tools, crochet is pretty good.  Only need a small set of crochet hooks, maybe some shared notions like a stitch marker and/or row counter, and you're set.  Knitting requires way more tools and notions, and that costs money.  Also, due to the way you use knitting needles, quality becomes a lot more important, also upping the cost.  In conclusion, if you're really broke and don't already knit or crochet, learn how to crochet.  Or stick to one area of knitting, so you don't need as many tools.  Or find a knitting friend that will loan you stuff.  They all work. If you're not broke, then just be prepared to spend a lot building up your tool stash if you're learning to knit.  Or ignore how much money you're spending on your hobby.  Either way works.

November 1, 2011

I'm Still Here

It's just that I've been a little busy, and buses have been running a little late recently, so I haven't managed to sit down and write a good post.  I'll do it this weekend, I promise.

Well, not doing it last weekend was all my fault.  I was too busy trying to make progress on the Crazy Cable Blanket:


In which my brother informed me, after I made the point that I had only done 45 rows out of 420, that he thought I'd have it done by the end of November, and was therefore shocked I hadn't made much progress.  I pointed out that I had told him that I wouldn't be done by Hanukkah, so what made him think I would be done by November?  Really?  It's not that I'm a fast, well, anything, and they know that.  It takes me a couple of months at best to crochet an afghan, and that's a not-so-complicated, bulky weight, one.  Knitting crazy cabling in worsted weight?  Yeah, I'll be lucky if I have it done by the end of the cold season.

Anyway, if you ignore the rather icky cable job in one place, and the day I picked it up, proceeded to make 3 mistakes in two rows, hacked fixes for them, and put it down thinking it would only get worse from here, I'm making progress.  Slow progress, but progress.  Though I'm not using lifelines anymore, so if I really screw up I'm back to row 20. Yeah, maybe next year he'll get it as a Hanukkah present.  Maybe.

October 20, 2011

Magic Looping is a Good Hack

I hate DPNs (Double Pointed Needles, for the uninitiated).

Yeah, I said it.  I have never liked working on DPNs.  It's not knitting in the round that I hate; I love doing that.  As long as it's on a long circular needle, that is.  But I dread the point in my sweaters and hats where I have to pull out those crazy pointed things that stick out everywhere, catch on everything, and are a pain in the ass to knit on since you're constantly stopping to adjust the needles, move stitches, and on and on.

They also don't stop anyone from choosing to sit next to me on the bus, even when there's an empty row right in front of me.  But I digress.

This isn't to say I don't use them.  Not to say I haven't used them successfully either. But I don't like them, and more times than not, something ends up looking screwy.

Anyway, what brought it to a head this week was this:


Now, we already know I suck at 1x1 ribbing, but this is a new low.  Everywhere the needles meet, there's a big open gap between the purl and knit stitches.  If you look closely, you can see where I tried the rotating trick (rotating where the joins are is supposed to help hide the ladders, as they aren't lined up in a column.  Maybe for someone else it does, oye.).  To put salt in the wound, this is all I got done in three days of bus trips (though part of that is due to bus crowding and falling asleep on the bus...lets say this is all I got done in 4 bus trips).  3 inches of ribbing.  That's it.

It is now gone.  I got sick of all the gaps and curving ribbing. I ripped it out Wednesday night.  I then sat down and looked up a video on how to magic loop.

I now have this:


Look at it!  3 and a half inches of nice, neat, ribbing; the best 1x1 ribbing I've done so far.  And it was done in two bus trips.  No ladders.  No pointy needles clacking everywhere.  Why didn't I learn how to magic loop before?  Why did I buy every DPN from size 0 to 11 from KnitPicks when I had perfectly good needles and a long cable to knit small rounds?

I can tell you why, actually.  I bought most of the DPNs before I knew there were other ways of knitting small rounds.  And when I did learn of magic looping, most of what I was reading was along the lines of 'Why would you do that?  DPNs are superior.'  I got the idea that magic looping was a Bad Idea, a bad hack.  So I didn't go any further, and I bought more DPNs.

Well, magic looping may be a hack (after all, you are using a circular needle for something it really wasn't meant to be used for), but it's a very good one, at least for me.  I can knit faster, it works up neater, and I'm dealing with less needles.

It serves me right for ignoring the solution and wasting my time.  I shouldn't have cared.  When have I not liked a good hack?  It's like finding out that adding two lines to a stored procedure will make Microsoft Report Viewer generate columns using a stored procedure with a temporary table in it.  No, not my hack, but finding it did save my ass from having to completely destroy someone else's sproc to get rid of the temporary tables that shouldn't have been an issue in the first place (and, for the record, Microsoft Report Viewer is something else I hate.  But that's not knitting related, so I'll drop it).

Oh, and before I go, I guess I should clarify how I usually use the term hack.  A hack is a solution to a problem that doesn't actually fix the problem.  Instead, it works around the problem, and is often not pretty, efficient, or smart, but it works.  If I say I hacked something in my knitting, I usually mean I fixed my knitting mistake by doing something else instead of frogging it back and doing it right.  For example, fixing too many stitches increased by knitting two together on the next row.  That's a hack. Sometimes this is a good thing (who's going to notice an extra increase and decrease in the area under your armpits?).  Sometimes, it isn't, because the problem still exists and leaving it there or even the hack itself can cause other issues (that area where you had extra increase may now be too big, and will sag, making it noticeable anyway).

And by googling the word hack, I just found out the other word for it is kludge.  Anyone else ever hear that word used?  Kludge? Maybe it's because I'm a programmer, but I've always heard it called a hack.  Link here if you're interested.

October 16, 2011

Busy, Busy, Busy

This is a quick post, since I've been a bit busy this weekend, and still have things to do (like my laundry).  Was in the city Saturday for family driven plans, and then today I went to see this:


That's right.  I got up to Rhinebeck for my first ever Sheep and Wool Festival.  Which is funny, since I live, oh, a little more than an hour away (hence my last minute plans), and I have never heard of the festival in my life until I joined Raverly.  I, of course, also broke several of my rules and left with all of this:

Well, that and a crochet related item for my mom, which will be the surprise part of her Hanukkah present.


The middle two dark-blue skeins are some alpaca for a hat for my mom.  It'll be a Hanukkah present.  She requested that it be alpaca, though I have to get her to pick out a pattern for it.  The others were just 'oooh, pretty' buys, which means I have no clue what I will do with them, and they were the most expensive yarn I've bought so far.  I'm a sucker for jewel tone blue and black combos, and there were a lot of them. Not that I still have a sweater to finish, or at least get to the point where I can take it back on the bus, no suree:

Yeah, yeah, yeah, I know, I need to stop writing about this. 

Next time, I'll plan ahead and take the patterns I want to do to Rhinebeck so I can get yarn to match. 

Anyway, since I'm an idiot and forgot my camera, the sheep and alpaca pictures above are from my knitter-in-crime sister, who I got to come with me last minute, and insisted that since this was the Sheep and Wool Festival, we had to go see the sheep.  And I swear that sheep in the first picture was posing for us.

October 10, 2011

Problems with Vinegar Baths and a Resultion to Ribbing Woes

Ok, so I decided to still do the 1x1 ribbing on the bust of my Milk Maiden sweater:


To keep it tighter, I kept all the stitches I either knitted or purled on the tip of the right hand needle until I did the next one.  It seems to be working as good as the examples of other peoples' work I looked at.

On the other hand, I was helping my mom block a shawl she crocheted today (yay corporate holidays).  I ended up doing most of the work because the yarn she used, Madelinetosh's Tosh Light, bleeds oh so very much, and I dealt with the same problem with my Tosh Light shawl.  Now, for my shawl, I stopped the bleeding with two vinegar washes.  Hers...well, it was still bleeding after soaking it in three vinegar baths.  I just gave up and told her to tell the giftee that if they wash it, not to wash it with anything else.  It at least wasn't as bad as it had been.

Now, from my research, I know that vinegar is supposed to be the best way to stop bleeding yarn.  So I don't get what I'm doing wrong.  Am I diluting the vinegar too much?  Does it not work for some yarn dyes? Was I not using enough vinegar (the shawl was a whole lot bigger than mine, but I can't say I measured the vinegar out any of the times I used it)? I'm confused. 

At least I wasn't as confused as my stepfather, who was questioning my use of the vinegar, saying that he used vinegar as a caustic agent to clean out the coffee pot (that had recently decided to clog up and overflow coffee every time someone made it.  I claim no fault.  It worked fine for me last Friday).  I stupidly replied: 'Well, don't you know that that's how Easter eggs are set?,' completely forgetting that my stepfather has never dyed Easter eggs (explaining this would unfortunately require a whole paragraph, so I'm not).  My mom and I had to explain that vinegar is used in Easter egg dye to set the dye on the egg (for any other folks out there who've never dyed Easter eggs for one reason or another).

Tomorrow, it's back to my actual paying job, and not knitting the crazy cable blanket.  That I just found a mis-crossed cable on.  Ug.

October 9, 2011

Ribbing Woes

I have realized that I suck at 1x1 ribbing. I should have noticed this when I did it at the bottom of the sweater:

I should have thought, hey, this isn't good, I need to learn to fix this.  But no, I conveniently forgot that the bust area of the Milk Maiden sweater is 1x1 ribbing as well.  And when I actually got to that part of the pattern, I forgot that my 1x1 ribbing sucks. So I began ribbing, only to find out that, yeah, having gaping stitches is not conducive to the bust area of a sweater.

So I pulled out 6 rows, and tried again.  I tried twisting the rib, but that just creates huge gaping holes in between the stitches.  I tried twisting the knit stitches only, but that leaves gaping purl stitches.  I tried loosing my tension (this seems counter-intuitive, but according to what I read, trying to pull your stitches tighter makes gaping ribbing worse), but it didn't work either.  I've pulled this part of the sweater out three times already, and I've made no progress since Tuesday (though crowded buses and the idiot that sat next to me with a huge duffel bag in his lap that took up half my seat space didn't help either).

Now I just don't know what to do, other than change it to a 2x2 rib, since I magically don't have this issue when I do any other multiple of ribbing. It'll also mean the bottom won't match, which I'm fine with.  As long as I do the sleeves the same way, I think it'll work.  But I rather do it right.  How the hell do I do 1x1 ribbing without gaping holes?

October 2, 2011

Internal Rules and Current Projects

I know I wrote last time that my next post would be on something different.  That was last week.  I'll get there at some point, I promise.

For now, however, I'll cover something that's currently on my mind, and in the meantime cover what I'm working on now (as well as a couple of past projects).  Therefore, I present the first set of my Internal Rules for Knitting.  These are some rules that help keep my knitting under control, which means they're broken half the time.  Anyway:

1) I will only buy yarn if I have a project in mind for it  After all, this is what I ended up with the first time I didn't do this:

Yeah, that's a current picture of some ugly Lion Brand Swede sitting in my stash

I told myself after that little incident that I would never buy yarn on a whim again.  I would wait until I had picked it for a specific project.  Especially if it was on sale or cost a pretty penny. This would keep my yarn spending under control, and make sure I use what I buy.

However, it also seems that it's quite valid to make an exception when I feel bad about returning yarn to my LYS because I was allergic to it and bought the substitute yarn online.  That's how I ended up with two skeins of this:


The yarn is Madelinetosh's Tosh Light in their Baltic colorway, which I am rather attracted to.  That shawl is the first skein, and came out of the fact that I bought this yarn on a whim.  This, of course, leaves the second skein just sitting there, because while I enjoyed the challenge of learning how to knit lace, I'm not touching it again any time soon. It's this pattern, no modifications. My notes on it here.

It also seems that I'll make an exception I find out some distance relative is having a kid, and I have lofty goals and loads of motivation that I'll make dozens of baby things.  That's how I ended up with all of this:


At least I got a project done for said baby, though it only took one skein of that grey yarn in the back (Bernat's Softee Baby in Gray Marl by the way, though if you can't stand acrylic, don't get it.  It works up like acrylic, though it softens up in the wash)  That sweater is a modified version of this pattern. For notes, go here.

2) I will not spend more on yarn for a project than it would cost me to buy the finished product retail.  This will make my knitting practical, and save me money.  Well, sometimes.  It turns out that an alpaca sweater can retail for $130-140 dollars, which of course is only a little higher than I spent on making this:

However, spending a year and making several projects while twisting your knit stitches is priceless. But that's another post.  This is a modified version of this pattern.  My notes here.

It was also a gift to my mom, so I really didn't care about that one so much.  Given that she's spent more than that making a crochet bedspread that I grew to not like pretty quickly, among other things.  However, it also seems that the rule goes out the window if I like the colorway, which is how I ended up with this:

Project notes are here

This is my current bus project.  The pattern is the Milk Maiden Pullover from Brave New Knits, and it's one of the only reasons I bought the book.  The yarn is Madelintosh's Tosh Sport in their (new?) colorway Fathom. I officially love this colorway. Look at it, my favorite color combination, just slightly variegated enough to be interesting. It's perfect for this pattern too. I had to get it. I don't care if I can get a sweater for $40 bucks and this cost me almost $70, it's worth it. And I'll break rule number 1 if a Madelinetosh Sock onesie pops up in this colorway. Or this colorway gets discontinued. Love, love, love.

And yes, I've modified it, since I modify almost everything.  Why I tend to modify everything is another post, though. Back to the rules.

3) I will use up most of my stash before buying more yarn. Yeah, never managed to follow this one:

Most of my stash. It's a combination of whim yarn and extra skeins from other projects. It lives under my bed and out of my mind for the most part.

The only thing that makes me feel better about that is that it seems that most people I read about online have much larger stashes.  Hey, mine (barely) fits in a Tupperware container. Then again, they seem to have much nicer yarn in their stashes too. Yay?

And now for a rule I'm actually not currently breaking:

4) I should only have one bus project and one at-home project at a time.

First, I'll define what I mean by 'bus project' and 'at-home project'. Bus projects are, obviously, projects that I can do mostly on on the bus. This means that they get worked up faster, but they tend to be simpler. Though 'simpler' is a bit relative, as I have no problem including some sweaters in this pile, as you can see from my bus project above. If it fits in my briefcase and doesn't require either being chained to the pattern or a chart or a lot of color-work, I can usually do it on the bus. Lots of stockinette or very repetitive patterns are a plus here, though I have done drop stitch lace, finishing off projects, and cables on the bus successfully. On the other hand, at home projects are usually things I want to make, but are way too big and/or complicated to work on on the bus. This officially started when I made that lace shawl above, as I realized that in order to make a lace shawl, I was going to need to be chained to the pattern and be able to finish a row in a sitting. I can't do this on the bus without really annoying my fellow passengers. I decided to spare them.

I'm now working on this:

My project notes are here

This is the pattern St. Ciaran from the new and expanded version of Aran Knitting. I'm not really mortifying it (gasp!), though I'm using Berroco's Comfort Worsted to make it instead of a wool-based yarn. This is because I'm making it for my brother, who's still a kid and still trashes things. Therefore, it had to be 1)washable and 2)not too expensive to make. I picked the pattern out, though he approved it. I like torturing myself, though I'm not finding it too hard at this point, just tedious. I should be working on it right now.

I'll go do that.

September 26, 2011

Don't Mind the Changes

I'm playing around with the template, and probably will be for awhile.  I apologize in advance if something changes out in front of you.

September 24, 2011

Obligatory First Post, or How I Learned to Compile Yarn

The obligatory first post of every craft blogger (in my opinion at least) is how exactly you ended up so obsessed with this stuff anyway.  Knitting?  Crocheting?  Don't you have better things to do with your time, like playing Angry Birds on your smartphone?  Isn't that the obligatory bus activity after sleeping?

Well, other than the fact that I currently don't own a smartphone, the answer is that I like making things.  I like making things in ways that only annoy me sometimes.  I like getting to the end of the day, a day where everything could be going to hell, and being able to say: 'Well, I spent my whole day trying to get this program to work and it still doesn't work, but I got part of this sweater done, so I'm not completely useless.' I also like being able to do something during my commute which has tangible results, and keeps me from falling asleep (I don't care how interesting a book can be, when you get up at 4 in the morning, you'll still fall asleep.  If I fall asleep knitting, then there's no hope that day.  Falling asleep on the bus results in more headaches than not for me).

The second part of this is, of course, how did I learn?  Well, my mother taught me to crochet when I was in 2nd grade, and since then I've picked it up on and off depending on if I was motivated enough.  I got good enough to start making up my own crochet patterns when I was in high school.  Crochet kippot, mainly.  I then dropped it all in college, more or less, making only a scarf for a roommate during that time.

When I graduated and started working full time, I found myself back home with nothing much to do, and more time to do things.  Needing a hat and scarf to wear to work, I picked up my crochet hook again and BS'ed a hat and scarf set.  I then set out to prove I could do something bigger, found a afghan pattern I liked, and completed it (that afghan is the Demented Squares Afghan, by the way).  From then on, I always had a project going, though I didn't devote much time to them.  Part of the reason is that I never found crochet patterns I loved, and I wasn't good enough to make anything amazing on my own.  My mom also scared me away from making wearables, as she has trouble with them, though I started getting over that.

Then, one weekend, my mom decided that she would try to learn how to knit.  I decided that I would try to learn with her.  We went out, bought a learn-to-knit book, needles, and yarn.  My mom ended up getting frustrated and dropped it.  I, however, learned to knit.  (In a completely unplanned step, so did my youngest sister, who never got the hang of crochet and so had spent much time ignoring yarn crafts (she, however, cross-stitches amazingly well.  It's a craft I wouldn't touch with a ten-foot pole.  I hate sewing and anything like it)).

I then learned that despite spending all that time wondering why the hell someone would do a craft that involved more than one active loop at at time, I loved to knit.  It made a fabric I liked the look of better and that worked much better for wearables.  There were tons of patterns out there than I liked, and I then found Raverly.  Enough said. It was new to me, and I was motivated.  I also learned to knit just at the time I was looking into getting more into crocheting, and it took me right off that track and applied my motivation to another one.

So now it's a little over a year later, and I now mostly knit.  I still crochet, and I think there are still some things that are better crocheted (another topic for another day).  Its all gotten me though hard times at work, gave me gifts to give people, gave me something that I could do on the bus and stay awake, and let me get shirts that actually fit (when I do it right, of course).

And now I should go to bed.  To come, I'll cover some of the issues I had learning to knit, talk about some of my thoughts on both crafts and where I stand with them, as well as mention why I named the blog what I did (it's more embarrassing than exciting, so don't get your hopes up).

'Night.

Ok, So I've Decided to Actually Blog on This Thing

Originally, I created this blog for the sole purpose of putting my first original pattern somewhere online.  It was easier for me to stick the patterns on a blog and link back to it on Raverly, than trying to create a Raverly download.  I was also naive enough to think that I'd have more time and willpower than I do, and that I'd have a ton of patterns to share with the world.

Yeah, didn't happen.  What a surprise. 

Anyway, I've been thinking.  I've been putting all my trials and tribulations with my projects under my Ravelry entry for them.  While this allows issues and other changes associated with the pattern to be easily found, some of my other...um...issues have been lost under some random project that ended up associated with it.  As well, I've been inspired by reading a couple of established knitting bloggers in that maybe, just maybe, by posting my adventures in knitting and crocheting that someone will not make the mistakes I did, or at least be entertained.

Or it'll just give me an avenue to gab over where no one will really be listening.  One or the other.

So I'm going to try and actually blog on this thing.  I will try not to rant (I have a habit of rant-blogging; it killed another blog of mine).  I will try to help.  I'll try to post once a week.  I will do my first post after this one.  Worst case, I stop and this blog will again just be for my patterns.  Best case, maybe someone will be educated, I'll make more patterns, and also find the time to edit this blog's layout.  In between my long commute, 8-hour work days, my current apartment search, and the projects I'm working on.  Yeah, that's it.

July 9, 2011

Reversible Eyelet Hat

My first written down knitting pattern, so enjoy!

Reversible Eyelet Hat
A ribbed hat with a simple eyelet pattern that can be worn inside out for a funkier look.


Craft Type:
Knitting

Skill Level:
Easy+ (you'll need to know (or learn!) how to do a yarn over increase and knit and purl together decrease, as well as knit and purl).

Finished Size:
Adult One-Fits-Most. It's about 20 in circumference at bottom un-stretched and can stretch to about 30 in circumference for the original 100 stitch version. About 8 in in length, but you can make it longer by completing more repeats in the body of the hat, if you prefer.

If you wish to make the hat smaller or larger, the pattern is done over a multiple of 4.

Gauge:
5.5 stitches = 1" in k2, p2 ribbing.

Materials:
1 skein of any worsted weight wool (I used Patons Classic Wool for the hat in the photo, but while it's not bad, I don't suggest that yarn unless you're looking for something convenient and cheap).  Make sure the skein is around 120 yds or longer, or else you may need 2 skeins.
1 US 8 16” circular needle (or whatever size you need to get gauge)
1 set of US 8 DPNs (or whatever the needle size you used above is)
1 stitch marker

Abbreviations:
CO – Cast on
K – Knit
P – Purl
YO – Yarn over
P2tog – Purl two stitches together
K2tog – Knit two stitches together

Instructions:
CO 92 on circular needle. Join in round, making sure not to twist stitches. Place row marker at beginning of round.

Rows 1–5: * K2, P2 *, repeat from * to * in this step as well as in rest of pattern.
Row 6: * K2, YO, P2tog *
Row 7: * K2, P2 *
Row 8: * K2, P2tog, YO *
Row 9: * K2, P2 *
Row 10: * K2, YO, P2tog *
Rows 11-14: * K2, P2 *

Repeat rows 6 through 14 three more times (or more or less depending on your desired length of the hat). For the last repeat, complete up to row 13.

Decrease section (switch to DPNs when needed):
Row 1: * K2tog, P2 *
Row 2: * K, YO, P2tog *
Row 3: * K, P2 *
Row 4: * K, P2tog, YO *
Row 5: * K, P2 *
Row 6: * K, YO, P2tog *
Row 7: * K, P2tog *
Row 8: * K, P *
Row 9: * K2tog *
Row 10-11: * K *
Row 12: * K2tog*, K

Repeat row 12 until you only have 4 or 5 stitches on the needle. Cut yarn and thread end through the remaining live stitches, then pull closed.


Finishing:
Weave in ends, making sure to hide them well.


* * *

If you find any errors in this project, please e-mail: CompileYarn[at]gmail[dot]com, or leave a comment  here or on Ravelry.  Copyright (c) invisican/CompileYarn().