Showing posts with label learning to knit. Show all posts

January 4, 2014

Knitting by Structure, Part 2: All About Stitches

Introduction

As I stated in my series introductory post, the first step in learning how to knit by stitch structure is actually learning what stitch structure is.  After all, you need to know what you're aiming for before you learn how to do it.

Now, this isn't going to be an in-depth look at knitted fabric and how stitches behave in it.  I'll touch upon a few high-level items there, but that's not what we're really concerned about at the moment. What the student needs to get out of this is two things:
  1. A basic understanding on how yarn becomes stitches becomes knitted fabric, and
  2. The parts of a stitch, both active and in the fabric. 
For many people, a deeper understand will come with time and practice, so if you don't quite get it, it may be helpful to continue on and re-visit once you've gotten to the point where you have needles and yarn in your hand (or have knitted a thing or two after learning this, if you're already a knitter).

Fabric and Stitches

Simply put, knitted fabric is just a series of interlocked loops called stitches. This is easier pictured than described, so here's a diagram I found on Wikipedia (click to go to source):


Now, this happens to be the knit side of a piece of stockinette fabric, but it all works similarly (though looks different) so I'll ignore that for now.  Typical hand knitted fabric is produced by holding a set of 'active' or 'live' stitches on a needle, and using another needle to pull a piece of yarn (that is as continuous as you can make it) though the active stitch, creating a new active stitch.  You then drop the old active stitch and repeat the process on the next one.  What this does is what the red line above symbolizes: creates a row of stitches that is in reality a part of a piece of yarn looped through another part of the yarn to create a fabric.  These stitches remain active until you either create a new stitch through that stitch, or you complete a process called binding off.  To get the first set of active stitches, you complete a process called casting on.  Binding off and casting on are things you'll have to learn, but they're out of scope here.  The only thing you'll need to recognize with casting on is that it'll create a series of loops that you'll treat as normal stitches.


There are two major actions in hand knitting that one uses to produce a stitch, and unfortunately they're also called stitches (you'll find that there's a lot of things call stitches in knitting.  They are not all the same thing).  The knit stitch, as shown above, is when the working yarn is pulled through from the back to the front of the active stitch.  The purl stitch, on the other hand, is when the working yarn is pulled through the front of the stitch to the back..  You might notice something here, which is basically these actions are opposite sides of the same coin.  If you perform the action of a knit stitch on one side of the fabric, the stitch is a purl on the other side.  If you purl it, its a knit stitch on the other side.

And this is pretty much the whole basis of knitting.  Everything else is variation.  For example, I mentioned that the diagram showed a piece of stockinette fabric (which is also called stockinette stitch...yeah, I know).  Here's a real-life picture of it:


 Look at the diagram and/or the picture. Can you figure out how the stitches build to create that?  Basically, stockinette is just where you perform the knit action into another knit stitch for all the stitches (or a purl into a purl stitch, if that's what's facing you).  This causes all the knit sides of the stitch to face one way and the purl sides to face the other way.

Another common fabric type is called garter stitch, and it's the opposite of stockinette in a way.  Garter is produced by knitting into a purl stitch and vice versa, which creates rows of stitches that alternate which side is facing where:


Anything more complicated fabric type than this is the same way.  It's just an action creating a stitch where the knit and purl sides face specific directions in a repeated manner that creates a specific looking fabric. And even if you get away from that statement with, say, cables or decreases or some such, you'll still be preforming the same action in the end to complete them.  You either knit, or you purl.  You may switch direction and work through different loops, work through two or more stitches (or something that isn't a stitch), swap the order of the active loops, or whatever.  You still either pull the yarn through back to front, or front to back in the end.

Actually, there is one exception here.  It's call a yarn-over.  All a yarn-over is is an active stitch you created out of thin air with the working yarn by creating a loop without pulling it through anything.  It's works the same way as any other active stitch, and has the same parts.  Don't worry about it though until you get to increases or lace. 


The Anatomy of a Stitch

Every stitch you create, whether it's a knit or purl stitch, has four specific parts.  Let's take a stitch from that diagram above, shall we?


The first two parts are that the stitch has a front and a back.  The front of the stitch is the face of the stitch facing you (no matter what side of the fabric you are on...this is important.  The front of the stitch is not always its knit side) when it is lying flat within the fabric and open.  The back, of course, is the opposite side.

The second part is what we call the legs of the stitch.  The legs are the sides of the loop:

Well that's not the best quality there....but you get the point
They are named based on the front of the stitch, that is, the right leg is the leg of the stitch to the right when you are looking at the front of the stitch.  Same for left.

When the stitch is active, one of these legs is also called the working leg.  The working leg is the leg used to orient the needle you're putting the new stitches on. This has to do with the fact that when the stitch is active (that is, it's on a needle), the stitch doesn't lay flat and there's a needle going through the stitch.


To use an active stitch, we must guide the other needle on one side of the stitch or the other due to the holding needle.  The side used is the side with the working leg (in mechanical instructions, it's usually termed in terms like 'going x to y direction through the z side of the stitch').

This sounds complicated but it's not.  The rule to identifying the front side of the stitch and the working leg is thus: The working leg of the stitch is always the one closest to the needle tip, and the front of the stitch is always the side tilting towards you.  In this format, this does not rely on stitch orientation or style or stitch type.  For the sake of working a stitch, this also holds true if the active stitch below is twisted; that is, the stitch legs are crossed and therefore the faces of the twisted stitch is flipped in relation to what was shown above.  This is because that statement isn't in relation to the stitch itself, but the knitter working the stitch.


Wait, What's Stitch Orientation Mean?

I'll cover this a bit better in the next post as it's related to knitting styles, but the stitch orientation is simply the way the active stitch is sitting on the needle.  Different styles produce different orientations, but there are two main ones in use.  The important part about stitch orientation that you need to know is this: stitch orientation is dictated by what direction you wrap the yarn around the needle before pulling it through the stitch.  That's it. 

While most mechanical knitting instructions and patterns presume a certain stitch orientation, the whole point of this is that it doesn't.  So don't worry about orientation for now.

Conclusion

So there you have it; the basics of how stitches work and how they create knitted fabric.  If you don't take anything else away from this post before moving on, remember this:
  1. Stitches are loops and they have a front and back as well as a left and right leg.
  2. Fabric is created by pulling yarn through a previously created stitch in a specific manner.
  3. These manners of creating a new stitch are called 'knit stitch' and 'purl stitch' (or knitting and purling).
  4. A knit stitch and a purl stitch are opposite sides of the same 'stitch'.
  5. Active stitches are the ones on the needle that have not had a stitch pulled through them yet.
  6. On an active stitch, one of these legs is called the working leg.  It is used to guide the other needle.
  7. Stitch anatomy for all future instructions is based on the knitter's perspective, not the stitch's or fabric's.
  8. The working leg of an active stitch is always the one closer to the needle tip and the front is always tilted towards the knitter.
  9. Orientation is dictated by the direction you wrap your yarn to create a stitch.
Don't worry if it doesn't make complete sense now, especially if you've never knitted before; once we get to the actual knitting instructions, it'll come together. 

January 2, 2014

Knitting by Structure, Part 1: Um...What, Now?

Well that was a break I didn't intend to happen.  I'm behind on a lot of things.  Not my knitting so much, but everything else...yeah.  Happy New Year everyone.

Anyway, here's the start of something helpful for once. I've been meaning to do this post series for a bit, but since I'm lazy I just got around to it.  Might as well actually do something useful after some radio silence.

Knitting by Structure Series: The Part Where I Discuss What I Mean By This, Why You Should Read It, and What It Will Cover
(otherwise known as Part 1 - Introduction)

If you've been around the knitting realm a bit, you've probably noticed how most instructions for knitting are set up.  They usually go something like this: Step 1, do x motion.  Step 2, do y motion, Step 3, Profit.  That is, the instructions focus on the mechanics of the actions you need to complete.  They tell you what direct to put your needle, how exactly you should hold your yarn, and wrap the yarn around the needle, and so on. 

It makes the instructions simple, usually self-contained, and has a huge flaw in that it presumes one way of knitting is correct and makes the average student a slave to the instructions.  Ok, maybe that's a bit harsh, but you get the point.  A lot of people will read the instructions, mechanically follow them, and that's all they know.  If they run into an issue, or need to do something else, they have to go off and find more instructions.

I don't mean to pass judgement on the people that do this.  This is how many things are taught.  It makes it easier to learn as you just have to follow the process, right?  It's also how most of us will explain a new technique to other knitters...me included.  It's normal.

However, I propose a different method of looking at the action of knitting.  I think the focus should be on structure than the mechanics of the knitting process.

What do I mean when I say 'structure'?  Well, I mean the focus should be on the why of knitting, instead of the how.  That we should learn to knit by learning how a stitch works and how different actions influence it.  That the act of knitting should be taught by its generic algorithm, and that style (aka, how one holds the yarn and wraps it around the needle), should not be assumed by the instructions.  Make things modular; teach understanding and build up on that.

I will admit, this is a bit harder way of learning knitting.  The learning curve is steeper in the beginning, and you won't be able to jump straight away to producing results.  But the trade-off is that it levels out sooner.  Instead of just learning a certain set of mechanics, and having to learn to troubleshoot or a different technique after you make a mistake or want to change something, you gain an understanding up-front that makes it much easier to avoid some of the common mistakes one sees when learning to knit.  Or to understand enough to change things on the fly.

I will also admit that this line of thinking is a bias of mine.  I currently code for a living.  Condescending an activity to its essence, modularizing it so each part is semi-separated and re-useable, and building complexity on top of previous structure is good coding practice.  It reduces interdependence, makes things re-usable, can save time, and absolutely saves maintenance and enhancement effort later on. And that's the beauty of this approach.  You may have to put more effort in at first to understand what's going on, but later the whole arsenal of knitting techniques is open to you. To slightly extend another programming-knitting metaphor that someone else really came up with, we want to learn how to be more than compilers, reading instructions and changing them directly into fabric.  We want to be able to program the instructions a bit so that when the compiler reads something that doesn't compute, we don't have to spit out an error and leave it at that.

So with that justification out of the way, the following is the outline of Learning to Knit by Structure:
  1.  Learn the structure of a stitch.  What do we mean when we say 'stitch front' or 'left leg'?  How does each stitch interlock with others to form a knitted fabric?
  2. Become familiar with the knitting styles (this is things like English and Continental as well as Western, Eastern, and Combined).  How does each direct you to hold the yarn and wrap it around the needle (at this point we are not concerned on how to actually knit and purl)? 
  3. Learn and understand how each style effects the stitch orientation.  Why do we get the same fabric using different styles?  How do knitting patterns assume it works? What style do you gravitate to (at this point, you must pick a style to learn first).
  4. How do we knit and purl?  What must we do to read the stitch and know where to put the needle and pull the yarn through?  This will be presented in such a way it doesn't matter what style is being used.
  5. Certain things presume a specific structure and orientation in common knitting parlance.  What are they?  How do things such as directional decreases actually work?  Twisting stitches (that is, what does 'ssk', 'k2tog', and 'tbl' really mean)?
  6. There are other basic techniques that don't rely as much on such presumptions, but should still be learned as a basic: other decreases such as yarn-overs, increasing, picking up stitches, casting on and binding off (these may need to be taught before step 4, at least superficially).
At this point, a knitter that has learned and understood these steps can go off and use the multitude of resources out there to pick up more advanced skills.  Short rows?  Cables?  Lace? Shaping?  All these techniques build on the steps above: how does a stitch work, and how do we make it?  I purposed that anyone who has learned the ideas presented above will be able to pick up these kinds of skills no problem...even if all they can find is mechanical instructions.  As well, knowing the whys of knitting should guide you through any issues or mistakes...or even a shift in preferences.  Even when the fix is a hack.  Especially if the fix is a hack.

Now, of course really learning this comes with practice.  Mistakes will happen, something won't click for a bit, that's all normal.  Learning the basics of each step is enough to go on; once a knitter starts actually knitting, they should be able to learn with action as well as theory.  I know people learn differently, and they will gravitate towards what they find easiest.  Which may mean that a step will be done out of order.  That's ok.

However, if you want to learn this way (even if you already know how to knit), it does take one thing: eagerness to know why what happened happened, and a willingness to learn it...at least at the basic explanation level (after all, what is outlined here is skimming the surface a bit.  But we do have to balance why with how, and I get that most knitters don't have time for an academic-level discussion, me included.  Though if you want to go right ahead).  What I mean is that you can't just want the quick fix, just looking for the detailed instructions that you will follow to produce a result.  These are the people also running to someone when they got a virus again by downloading from a shady source a mistake occurs without even attempting to fix it. I get that you may not know off the top of your head (I don't remember much off the top of my head.  That's what the Internet and books are for), but you must be willing to try and learn at least where to find the answer.

Humans are pretty smart cookies.  Knitting isn't rocket science, or even programming.  You got this.

November 18, 2012

Guides for Self-Taught Knitters: All the Different Ways to Knit and Where to Learn Them

There are many books and webpages out there that let one teach themselves to knit.  If your book or website sucked, it would have just showed you how to knit.  That is, the author showed you one way to knit because that's how you do it, right?

Wrong.  There are multiple styles of knitting, and all are valid ways of producing knit and purl stitches.  A good self-teaching book will cover this, as all that matters is using the style that's most comfortable to you, and it's better to learn that style up front.  However, every self-taught knitter...hell, every knitter...should at least be familiar with the different styles of knitting.

Why, you may ask? Because knowing the different styles lets you:
  • Find the best method for you.  This may be the one you learned from the book you bought or your grandmother.  But you may find that you're more conformable or faster with a style you had no clue about before.
  • Use the best method for the situation.  For example, stranded color knitting is easier if you can knit using both of the most popular styles.
  • Understand some pattern assumptions that arise based on the knitter's own way of knitting.
  • Help or, ever better, demonstrate any method to a newbie (because your preferred way may not be someone else's).
  • Impress your knitting friends with your knowledge.  They may even think you're a better knitter than you are! (this is a double edged sword, so tread lightly).
So, lets get down to it.  One disclaimer, there may be other ways that I don't know about, so don't be offended if I don't mention some of the more obscure styles.  However, do let me know about them!

Oh, and this is an overview, not a teaching guide.  Use the links located in the 'So You Want to Learn It?' sub-section of each style to find good written and video instructions.


English Style
Also known as American style, this is the style you most likely learned from your crappy book you bought or that random website you found.  Very common in the Western world and in learn-to-knit guides for some reason.

What It Is
Either letting the yarn hang down or holding it in the right hand, the knitter produces stitches by using the right hand to wrap the yarn around the right needle.

The Positives
  • It's one of the styles you need to know for easy stranded knitting.
  • If you're a righty non-yarn-crafter, you may find this style easier to learn (as most of the action is done by your right hand).
  • It's pretty straightforward, and there's lots of instructions on it if it isn't.
The Negatives
  • It's easy to twist your stitches.  Just forget which way the yarn wraps around the needle.
  • It takes more movement to produce your stitches, so not the fastest method out there.
So You Want to Learn It?

KnittingHelp.com has series of videos on their site (second listed, page is for knit stitch but purl is in the menu).  They also have the purl video on YouTube. And now they even have the styles named right (when I first found the site, they had English and Continental swapped).

I like TECHKnitter for not only good instructions, but also explanations on why it works.  Link goes to knit stitch, see top for purl.

For Dummies isn't a bad series, and they have their knitting guides online (link also to knit stitch).

Searching YouTube always helps (so you can figure out how exactly you like to hold the yarn and so forth).


Continental Style
Also known as German style or Left Handed Knitting (not to be confused with backwards knitting), this is the other common method in the Western world.

What It Is
Holding the yarn in your left hand, you use your right needle to 'pick', or grab the working yarn through the stitch on the left hand needle.

The Positives
  • It's the other style you need for stranded knitting.
  • It's also straightforward and common enough to find good instructions.
  • Once you get use to it, it's fast.  There's less movement involved in this style.
  • If you're a right-handed crocheter, this style will most likely be the easiest to learn (as you hold the yarn in the same hand, keep tension in a similar manner, and move the right needle similar to a crochet hook). 
  • May be easier for left-handed people, as you control tension using the left hand.
The Negatives
  • If you've already been taught English style, it may be hard to learn.
  • There's a bigger difference between the knit and purl stitch, and purling is trickier in this method.
  • If you're an extreme righty, holding tension in your left hand may be tricky. 
So You Want to Learn it?

The For Dummies guide, TECHKnitter, and KnittingHelp.com's YouTube video series also have guides for this style.  KnittingHelp also has all their videos on their site (first listed). All links go to the knit stitch like before.

Personally, I purl using my thumb to pull down the yarn, though I can't find where I learned to do that (and I don't think it's the best way, just the way that I fell into).  I find that the continental style of purling has the most variation, so you may need to do some hunting to find the best way for you.

Another awesome way to purl when you use this style is called Norwegian Purling.  Very helpful for ribbing, as you don't need to switch your yarn from the back to the front.

Also, most these guides will tell you to wrap the yarn around your pinky for tension. This video shows an alternate way of holding the yarn (start at time stamp 0:50). While I also don't have the link from where I learned this, this is how I hold the yarn:


I find that searching for 'speed knitting continental' on YouTube may net you some good videos if you're learning this way to knit faster.


Combination Style
Eastern styles meets western styles to produce a more uncommon but interesting way to knit.

What It Is
The knitter deliberately twists their stitches so that the live loops face the opposite way, allowing the knitter to insert the needle in the front for both the knit and purl stitches (Doing this un-twists the stitch, therefore still ending up with the correct knit and purl stitch in the fabric).

The Positives
  • Knit and purl stitches can come out more even.
  • Style can be merged with either English or Continental (that is, you can hold the yarn in either hand).  This is because both of those styles are Western styles, and this is a merger between western and eastern.
The Negatives
  • Some pattern re-interpretation is needed, as decreases slant the opposite way when done in this style.
  • Nowhere near as common as English and Continental style, so getting help may be a challenge.
So You Want to Learn it?

A slightly better description can be found on this style's Wikipedia page

One of the best known people who use this technique is Annie Modesitt.  That link goes to her comprehensive online guides on this style.

I first found out about this style when reading Grumperina's blog.  That link goes to her set of how-to videos on this style.

KnittingHelp also has a video on YouTube for the knit stitch in this method and its also on their site (third listed).


Backwards (Mirror) Knitting
This isn't really a style, but instead a method of knitting by swapping the actions for each hand in one of the above styles.  To really confuse you, this is also sometimes called Left-Handed Knitting.

What It Is
Backwards knitting is where you use your preferred style to work left to right instead of right to left. In all the styles above, no matter what hand you hold the yarn in, you use your right needle to pull the yarn through a loop on your left needle, which produces the new live stitch on the right needle.  When you mirror knit, you instead use the left needle to pull the yarn through a stitch on the right needle, producing the new stitch on the left needle.

The Positives
  • May be the easiest way to knit for someone who's left-handed (hence why it's sometimes called left-handed knitting).
  • You can avoid purling when flat knitting by knitting the purl rows this way. Also helpful when knitting a pattern that involves constantly going back and forth for short distances (for example, entrelac).
The Negatives
  • If you mirror knit exclusively, you will have to re-interpret any pattern you use, as almost all patterns assume right to left knitting. This can be very confusing and a source of errors.  This is also why it's recommended that those who are left-handed try to learn one of the styles above first (that, and knitting  really does utilize both hands in manipulating the stitches, so non-mirrored knitting isn't strongly 'right-handed' in the first place. However, you are still using your right hand to wrap/pick the yarn, which may trouble some left-handed people.  All I can say is choose your negative).
So You Want to Learn It?

KnittingHelp suggests to hold a mirror up to their video to learn how to do it backwards (see last section), though I'm including this to more laugh at it (Really? How are you going to hold up a mirror and knit with the video?).

This video on YouTube shows how to do this English style.

This video, on the other hand, shows it in Continental style.

Conclusion
The styles above are all the ones I know about as of now.  I'll add to this post if I find other styles in my knitting travels.  And yes, I know I'm missing Eastern knitting styles...but as I'm in the western world,  I still need to learn about those myself.

October 7, 2012

The Dilemma of Classes

If any of you went to VogueKnitting Live New York last year, you probably received an email stating that you could pre-register a couple of weeks ago (turns out, you can only pre-register for the crazy expensive all-inclusive packages, so the rest of us are stuck waiting).  Ok, cool, I thought.  Now I won't sign up last minute...hm, class list; maybe I should take a class this time...

As I was looking down the list of classes, I noticed a lot of them are of the vein 'learn a this technique' or 'learn more ways to cast-on and off'.  Which is all fun and good...except I could find you instructions for ten different ways of casting on in ten minutes just sitting here at my computer.  I could even find a couple of videos for some of them if written instructions aren't your thing.  What's the point, then, of spending around $50-$60 to learn something I could just Google, or even spend at most $25-$30 for a book that has that has ten times more information that I can refer to indefinitely?

Now, I do get that there are people out there that need or want the physical presence of the instructor and the interactive instruction to learn something in knitting and crocheting, no matter how simple.  The point of this post isn't to behoove them, or make fun of the fact that the classes exist. No.  My dilemma, as an active self-teacher, is at what point is taking the class worth it?  At what point is what is being taught too complicated to detail on a web site, show on a YouTube video, or follow from a book?  What wisdom can only be found by paying $60 for a class?

It's not an easy question, though I have some notion of the answer.  You see, a couple of months ago I decided to make a mini-vacation out of Rhinebeck, partly as a gift to myself for last July (see, I *can* sign up for these things before the last minute). Since I earned overtime for that month, money wasn't so much of a concern.  So, the first thing I did was decide to take a class.  Unlike VogueKnitting Live, however, I looked through the class list for Rhinebeck once and immediately found what I wanted to take.  I'm going to be learning how to design a sweater.

Of course, I've already technically designed a sweater.  Two, if you count this disaster.  So why that class?  Because I haven't been successful in actually getting a pattern down, and I'm hoping that learning some techniques for designing will help me knock out my half-assed design-on-the-fly methodology that isn't working as well as I'd like.  Also, unlike cast on techniques or how to do stranded color-work, learning design and pattern-writing isn't a concrete, step-by-step process.   There's no 'do x, then y', so it doesn't lend itself to online tutorials, nor does it benefit designers to over-think themselves and explain it for free.  Sure, there's books out there.  I own a couple and have more in my (private) Amazon wish list. But what I've done obviously isn't enough.

So, is my self-teaching limit at the point of designing from scratch?  No, I don't think so; there's more books I can read, and I could benefit from a good stitch dictionary right now at least.  But it is the point where self-teaching becomes experimental and frustrating; where there's no straight how-to and over-researching is paralyzing so I do too little of it, ending up stuck.  It makes me realize how little I know of this craft.  So, when money isn't an object and I'm treating myself, it makes some sense to take the class.  Who knows, it may help, and hopefully it's fun.

But that brings me back to VogueKnitting.  Can I justify even taking a class on design when I have to justify spending the money?  Can I justify any of them?  That's my dilemma, and at this point that depends what I end up using from any class I rationalize myself into taking.

Knowing me, I'll end up signing up for something anyway.  It's not like I needed to attend a lecture either, but I've been to one of those already (it was more due to the pricing structure and wanting to get the hell out of my apartment that time).  I have into November 27th to decide before it costs more.

September 8, 2012

Learn to Knit Instruction Review: Craft Yarn Council's Learning Center

So, what's a web-savvy person going to do when they wish to learn how to knit or crochet?  Search for instructions on the web, of course!  So, my first set of guides are going to be focused on the result of googling for basic instructional guides on how to knit and how to crochet.

To start, I googled 'learn to knit', and got the below site as the first result (no wonder, as one of it's URLs is 'learntoknit.com').  Though the site covers both knitting and crocheting, since I started with learning to knit, this review will focus on the knitting guide first.

The Guide
Name: Craft Yarn Council's Learning Center
URL: http://www.craftyarncouncil.com/learn-home.html, though both www.learntoknit.com and www.learntocrochet.com resolve to the same page as well.
Contains: Guides on learning how to knit and crochet (along with some generic information about both). For the purposes of this review, we're staying in the Learn section of the site.  They have other instructional pages as well.

Summary
If you want to learn to knit well, run far, far away from this site.  The Craft Yarn Council's instructions for learning to knit breaks almost every rule for a good guide, including having incorrect information.  

Detailed Review
I can't say I've heard of this organization before, but the page you start on makes them seem like a good site to learn from.  If you're really curious, you can click on their About link in the top menu bar and see that they're an organization representing different yarn crafting companies (and the companies are listed). Hm, they sure have the resources to put together a good guide, right?

Which makes me kind of confused as to why their knitting guides aren't good at all, at least content-wise.  But I'm getting ahead of myself.

Since the first page is just a generic 'welcome to our guide' page, we can go over to the left hand menu list and click 'Getting Started'.  Even though that's the second link, I don't  care so much about 'Knit vs. Crochet', I want to learn to knit.

Doing that gets you to this page.  It's pretty basic and lacking in much detail, but I guess it's good enough for what it is.  It covers the very basics of  yarn weight, crochet hooks, and knitting needles...pretty good information to keep in mind, though it would be better if they mentioned how to match the needle size to the yarn weight.

From here, we can either click a link on the new left-hand menu, which lists all the guides for knitting and crochet.  I'm not 100% thrilled with the mixing of the two crafts, but it's not horrible navigation.  Also, they conveniently give you a link to both the 'Basic Knit Instructions' and 'Basic Crochet Instructions' on the top of this page, for which the first link takes you to the first link on the left hand side.

The title of this page is 'Learn Knit Stitch (Garter Stitch)'.  Which would be fine if they meant that they're going to teach the user the knit stitch in order to produce something in garter stitch.  But that's not the case.  The first sentence on this page states:
"The basic knit instructions below will show you how to cast on and to make a knit stitch, also known as garter stitch."
Um, no.  The knit stitch is not 'also known as the garter stitch'.  Knitting every row on a flat piece of work produces garter stitch.  But so does alternating rows of knitting and purling in the round. It the set of knit and sometimes purl stitches that make garter stitch.  Incorrect information on the first instructional page; not a good sign.

They then state that they're going to use an afghan square pattern to teach you how to cast-on and do the knit stitch.  First, why is the cast-on instructions on the knit stitch page?  It doesn't make navigating for reference easy at all.  As for learning in the framework of a project, I have mixed feelings about this.  On one hand, it is nice to try to get something good out of your first efforts.  On the other hand, trying to have brand-new knitters make something as the first thing they do is a set up for failure to teach and learn, unless the learner can take from the instructions that maybe the first couple of squares they'll do will be practice, and he/she will know to go on after they get a good square.  Also, this doesn't teach towards flexibility in skill.  Not the worst set-up, though.

What I really have an issue with here is the instructions for what you need.  Do they think they'd get useable squares out of a pattern that tells the learning knitter to get whatever worsted weight yarn they feel like and a pair of US8 needles?  This would have been the perfect place to introduce the concept of gauge and different types of fibers.  You could even tell the learner not to worry about it until they wanted to make a good square even.  But whatever.  The learner has the materials, now what?

Let's learn to cast-on!  To do so, let's learn a version of the Knitted Cast-On without telling you it's a version of the Knitted Cast-On.  It's the only cast-on ever, until you need a different one.  Strike two.

Of course, after only teaching the only way to cast on is teaching the only way to do the knit stitch.  Just like the instructions (which aren't bad) for the 'cast-on' used English style, they're teaching English style knit stitch (which, again, the instructions themselves aren't bad).  Without even stating that it's a style.  Why does it seem like all the guides teach English style as 'the' knitting style?  I don't get it.

So the learner gets done with their first row of knitting.  Yay.  Now here comes this lovely gem:
"Now measure your work. It should be about 7" wide. If it is too wide, start over and cast on fewer stitches; if it is too narrow, start over and cast on more stitches."
What?  No!  You NEVER measure a piece of knitting that's that close to the needle unless you're only looking for a rough estimate of width.  Your measurement WILL be wrong because having the stitches on the needle spaces them out differently than in the fabric alone. Who's bright idea was it to put this line in here?  Also, telling someone who just knit their first row to make sure it's the proper width and rip it out and guess how many more or less stitches to put on to get the right width is really, really bad thing to do.  How are they supposed to guess how many more or less stitches to put on?  If you were worried about the width, maybe you should have talked about gauge and had the leaner practice on a swatch, huh?  That way, they would know how many to cast-on in the first place and they would have some practice with knitting already.  But no, they just now have a frustrated leaner constantly ripping out their work because they're too busy guessing things. Hell, you don't ask a experienced knitter to do that if you don't have to.

So anyway, we get past that, knit the square, and get to the binding off instructions (which also aren't knit instructions, but if the cast-on's here, might as well through in the bind-off as well). The instructions are straightforward and detail the most common bind-off.  Unlike cast-on's and knit stitches, I don't really expect guides to cover alternate bind-offs, because they're pretty situation specific, and 9 times out of 10 you'll only need the standard bind-off (I don't even know if it has an actual name).  Acknowledgement of other bind-offs would be nice, but hey, they couldn't even cover any other standard cast-on so that's to be expected.

It also would be nice if there was a link on the bottom of the page that went to the purl page, but nope, got to scroll up to the left-hand menu bar to get there.

The funny thing here is that on this page, they acknowledge that garter stitch is the product of knit stitches instead of the knit stitch itself (by comparing purling every row to it, which, of course, is another way to get garter stitch).  The actual instructions here are simple and, other than maybe numbering the actual steps, is perfectly good.  Other than the fact that, again, they only show English style but call it 'how to purl', but that was to be expected at this point.

The last three pages in this guide cover increases, decreases, and the yarn over.  Unlike the rest of this guide, they're actually decent.  Both the increase and decrease guide covers two different ways of doing so, and even state that there are many other ways, but here are two of them.  The instructions are pretty clear (which is about the only consistently good thing about this guide), and they even mention the idea of the increases/decreases slanting one way or the other. The only issue I see is that on the increase page, the left-hand menu bar disappears, so I have to go back to the last page to get to another page in the guide.

In conclusion, I don't recommend this guide.  Despite no issue with the descriptions of the steps themselves, the guide itself, and especially the knit stitch page, is set up to confuse at best, and frustrate at worse.  There are factual errors and oversimplifications, and a couple of basic topics are not covered (like gauge and matching needle size to yarn size).  It may have some use for a quick 'how do I decrease again' type question, but that kind of information can be found in many places, most likely easier to find than this site.

Learn to X Instruction Review: The Contents of a Good Instructional Guide

Before I start my commencement of posting reviews of knitting and crochet instructional guides, I first want to establish what I look for in such a guide.  After all, it wouldn't be fair to rag on a site I found, or a book used, without stating why I find it so bad.

So, without further ado, I present what a good knitting and/or crochet instructional guide should be.  A good guide:

1) Is clearly written and well organized.

Obviously, one person's opinion of 'clearly written' and 'well organized' will be different than someone else's.  However, truly horrible organization, out-of-order presentation, and incomprehensible  instructions should be pretty obvious as things you don't want your guide to be. A good guide doesn't take the learner forever to find basic information,  gives instructions in simple and concise language (and/or pictures when necessary), and is presented in an order that let's the student build on previous knowledge.

2)  Will at least name the style they are teaching, if not actually presenting the learner with more than one way of doing something.  

I get it, guide writers don't want to confuse people and have a writing deadline.  But I say by just telling people 'this is how you cast on, this is how you knit, this is how you crochet', guide writers are actually doing the learners a disservice.  First off, maybe the person reading the guide will hate the way you're teaching them, but would be more suited for an alternate method.  For example, maybe they're current crocheters learning how to knit, and would be more comfortable knitting Continental style instead of the English style.  If you start by reading some of these guides, you won't have a clue what I just meant by that last sentence, and that's bad. Learners like this, when attempting to use a guide that only presents one way, are more likely to get frustrated and give up.  They can't learn! they'll say, not realizing that there's more than one way to do it.

The other downside with this format is that while the learners may be fine with the one presented method in the beginning, they then may run into issues when they decide to branch out past the stockinette or garter stitch square. What if you need a different cast-on, or another way to start a crochet circle? Someone who was taught 'this is how you do x' is going to be confused when they run into a problem better served by a different method. Someone who at least was informed, if not shown, a different way will be more likely to look for and use the better way.

All in all, I think it's better for a guide to show at least two methods of doing something.  It gives the learner a choice and lets them feel out what is best for them.  If the guide doesn't show more than one method, at least it should tell the learner they're learning, say,  the knitted cast-on, and that this is only one of many ways of doing it.

3) Will present all the basic techniques needed to knit or crochet almost anything

Yes, us more experienced knitters know the beginner's going to be knitting a scarf, and gauge isn't crucial.  This doesn't excuse the guide writer of skipping any mention of gauge, even if it's after teaching the student how to knit a square.  A good guide will teach concepts like gauge from the start, as it'll save heartache when the beginner decides to move on.

4) All the information is correct.

This should be a given. No sympathy for incorrect statements.

Also related: If you teach to a pattern or provide beginner's patterns, make sure they don't have any mistakes in them. A intermediate crocheter like me will realize quickly that there's a mistake.  The beginner's just going to keep following your instructions blindly and will most likely blame the bad result on their inexperience. Mistakes in patterns is another topic, but just make double sure that a teaching pattern is correct.


I think this is the basis of a good learning guide for beginners.  For learning guides for more intermediate skills, I'll say that 1, 2, and 4 are all still relevant, though 2 a little less so (after all, for some of the more advanced techniques there is only one way to do it.  Also, at this point, if you're looking up more advanced techniques, you're going to know to search for another method if you don't like the one you found).  Intermediate guides tend to focus on one technique, and that's fine.  It doesn't excuse unclear explanations, bad websites, not naming the technique (unless you made it up, then say that), and in-factual information.  Now, onto the reviews!

PS: I apologize for the previous post that was here; I click the wrong button and accidentally published my draft.


January 14, 2012

Guides for Self-Taught Knitters: Avoiding Twisted Stitches

I'm sure we all have that one mistake (or more) we've made while learning to knit, where we look back at it years later when we're more experienced and go 'Holy shit, how the hell did I do that?'  I'm not talking about the mistake you catch a few rows away and decide not to fix, nor the mistake you make when you think you can read the mind of the pattern writer from miles away and therefore read in the pattern directions that happen to not be in the pattern.  No, I'm talking about being oblivious to the fact that you're knitting wrong for a whole year because you never saw anyone knit in person.  That kind of mistake.

Being that it took several tries of Googling this issue before I found out what I was doing wrong, I wish to embarrass myself and show you exactly what I did wrong.  Welcome to the first post in my new series, Guides for Self-Taught Knitters.

The Mistake
Pop quiz: Can you tell the difference between these two hats? (Other than the fact that the top and brim is bigger on one):


If you said: 'Oh, the stockinette stitch on the bottom one looks a bit weird,' or, 'The stockinette is leaning a bit on the bottom one' , you would be correct.  This is more apparent in this close-up (the left hat corresponds to the bottom hat in the picture above):


Notice how in the left hat, the stitches seem to be tighter, with one side sticking out over the other, instead of flat and more open in the right one?  That's because in the left hat, all the knit stitches (which are all the knit-side stitches, since these hats were knit in the round) are twisted. What do I mean by 'twisted'?  Well, first, you need to go to this page to see a schematic of what a knit stitch is supposed to look like.  Notice how all the loops are open, and one row of yarn waves through the loops above and below it?  That's how stockinette should look like, and it how the right side hat was done.  Twisted stitches, on the other hand, are where the 'U' and/or upside down 'U' shapes in the diagram end up not 'U's, but crossed:

Source picture is here.
That red row in my badly 'shopped schematic is what every knit row in that hat on the left side is.  While it still creates the semblance of a 'U' shape, it pulls all the stitches tighter than they should be, which we'll see produces a whole host of unintentional side effects.

The Symptoms
You may be suffering from twisted knit and/or purl stitches if your projects are doing one or more of the following:

1) When you stretch a piece done in stockinette and/or ribbing, the stitches pull closed, not open, and the sides of the stockinette columns look like ladders:

2) Your ribbing sucks.  More specifically, the side in which you are not twisting your stitches (unless you're twisting both your knits and purls, in which you wouldn't have this issue) is gaping wide open, and you can't get it not to do that by knitting tighter.  Also, you have huge ladders between the columns (It'll look a bit like the stretched picture above; but unfortunately, I don't have a good example of this one).
If you want to test this, knit a round in 3x1 ribbing.  It will be obvious.

3) When knitting a raglan round sweater, the increase lines aren't straight.  Instead, it looks like one line is bigger than the other, though when you measure it, it's not:


4) When knitting stockinette in the round, the columns of stitches curve around the tube:


5) Increases and decreases look screwy.
Believe it or not, that top part is just stockinette in the round with standard yoke decreases.

6) The columns of stockinette don't lie flat; there's a definite edge on one side (this will be the side in which the 'leg' of the loop is on top).  See the second picture of this post.

Of course, there may be more here I never ran into.  As well, depending on exactly how you're producing the twisting, or if you're making another mistake on top of it, will change exactly what symptoms you're seeing.


Causes and Corrections
Since there are so may different ways to knit and purl properly, there are so many ways you could be screwing it up to produce the twisted stitches.  There is one constant here, though.  If you're knitting into the front of the loop (otherwise known as the knit stitch, where the needle is placed in the right leg of the loop from left to right), if the left side of the loop is facing the front, you're going to twist your stitch.  If you're knitting into the back of the loop and the right leg is facing you, you will twist your stitch as well.

To tell you how I did it, you first need to read up on the English knitting style, if you're not familiar with the term.  This is one of the two most common styles of knitting in the Western world, and if you learned how to knit out of a book, you most likely learned this method of knitting.

One element of this knitting style is that you use your right hand to wrap or 'throw' the yarn around the right hand needle to create the stitch. Now, pop quiz: which way do you wrap the yarn around the needle in English style?

*cue Jeopardy music*

If you answered 'clockwise', you would be wrong, and you just found the reason all your knit stitches are twisted.  You wrap the yarn counter-clockwise in English style.  Unfortunately, the book I learned out of did not have very clear instructions, as it didn't state this fact.  Then again, this was also the book where I first thought knitting in the back of the loop was how one actually knit, but at least it only took me one project to figure that one out (see this project for an example of that, combined with the twisted stitches issue).

Correcting one's action depends on how one was screwing up in the first place.  To correct the mistake I made, you just need to train yourself to throw the yarn counter-clockwise.  Or, you can do what I did, which was to say 'screw this, I'm learning how to knit continental style.'

On that note, I'm thinking my second guide should be on knitting styles, as the books I've seen tend to say 'this is how you knit' without explaining that there are so many different ways one can knit (and purl) correctly.

November 6, 2011

Knitting vs Crochet, Part 1: Tools and Notions

For my first serious post, I'm going to start a series comparing knitting (which is what I mostly do now) and crochet (my first love).  This one will be about the tools requires for the trade, and how they compare to each other.  And I have pictures, since earlier today I decided to re-organize all my craft tools.

But first, I would like to announce that I finished this:


I'll go over my final thoughts on it in a write-and-dash post later.  Now, to the comparison.

Knitting

To knit one simple project, you really only need two needles of the correct size. You may also need something like a stitch marker or a counter, but I won't count those because you need them for both crafts.  That's it.  Simple, right?

Nope.  Not in the slightest.  One of the more shocking things to me about knitting was how may damn needles you need to do all the projects you want to do.  Want to knit a sweater?  Depending on the sweater, you may be able to get away with a set of straight needles in the correct diameter (if knit flat or a cardigan), or you may need one or a couple of circular needles in the correct size and length, and a set of DPNs or longer circular needle to do the sleeves.  If it has ribbing, you usually need another set of needles a size down.  If you do hats, you usually use 16" circulars and DPNs, or a longer circular to Magic Loop the whole hat, presuming the hat's worked in the round.  For socks, you'll need tiny DPNs or long circulars that you most likely wouldn't be using for other projects. I could go on and on.  The thing is, if you knit anything and everything like me (well, not everything. I haven't gotten to socks yet since I don't usually like to wear them, but I will eventually) in any and all yarn weights (I've knitted everything from super bulky to light fingering), you end up needing a lot of different needles.  If you're a person who prefers straight needles (not me), you're going to need a whole set of straights, a whole set of DPNs, and some circulars for those random projects that need to be knitted in large rounds.  If you like circulars like me, you maybe could get away with less needles, assuming you prefer magic loop as well and don't buy a whole set of DPNs before you realize that.

That's the other thing, though.  If you're new, you're usually directed to the straight, cheapo needles and set to go (unless, of course, you learned from someone who preferred differently and/or knew better).  That's what I started on, having learned out of a book bought at a big-box craft store.  Then, if you expand your horizons beyond scarfs, you'll mostly likely find your way to DPNs and circulars when needed.  If you don't hate circulars and/or don't absolutely love and can't deal without straight needles or just prefer circulars, you would be smart to sit back, realize that in order to do all the things you want to do, you'd need to buy not only a different size needle, but 3-5 different lengths for the circulars, so it'd make sense to invest in a interchangeable set now, before you buy all those needles.  You'd be really smart to realize that you prefer magic loop before you buy all the DPNs, but hey, it's the price I pay for learning without another knitter around.

Anyway, here's all my current tools:


I was lucky and realized I preferred circulars and things knitted in the round early, so I went and bought the interchangeable set from KnitPicks, which definitely has saved me money and kept my needle count down.  I chose this one because I prefer metal needles and decent prices, and the other two metal sets in existence didn't fit both criteria (Boye's is cheap, both in price and quality, and the other one (I'm blanking on the brand) was more expensive for less sizes).  I've had a couple of issues with the cables popping out of the metal screw top, and needles becoming unscrewed despite being tightened, but nothing major or constant (and KnitPicks did replace a cable for free when it broke on me the first time I used it.  They're pretty good about that).  And I have to say, I love the sharp points.  My right index finger will beg to differ, but that's all right.

Oh, and I still need more needles if I ever get around to that sock, since the smallest interchangeable head is a US 4, and I don't own a solid US 0, 1, or 2 in a length above 24".

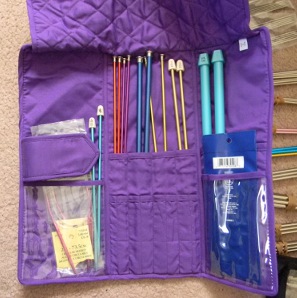
Also note the notions in the right hand corner.  Needle caps, cable needles, stitch holders...all notions unique to knitting.  Even with the interchangeable set keeping some of the cost down, I'd have to say that all those tools in that picture are worth around $200 US dollars (still need to actually tally it).  Not counting the purple holder at the bottom, which has the straights I bought before I went circular and interchangeable:


That's probably another $40-$50 there.


Crochet

So, what do you need to crochet anything and everything?  This:


That's it.  Well, it's not all the crochet hook sizes you can get (I don't own my own Q or M hook, nor all the 'steel' ones), and I managed to lose my G hook when it fell out of a hole in the plastic bag I had a project it (which, ironically, was a knitting project.  I was carrying it around to pick up stitches if I needed to), but that's all the crochet hooks I've ever used.  I've crocheted everything from super bulky yarn to crochet thread as well, so it's a good range.  That whole thing cost me around $40.  If I got the rest of the set, it would cost me around $60-$70.  Of course, this presumes you get the same hooks I did, which the cheap Boye ones (which are fine since I prefer metal hooks, and all a crochet hook has to do is hook the yarn through a loop.  I also prefer the hook shape on the Boye's; there's another cheap brand that does a different style hook, and I don't like it.  That's probably what the green, extra K hook I have on the left is.  I never use that hook).  If you go to a mid-upper-level style of hook, it may cost more more like $100 (though I just looked, and you can even get a Clover soft set for $40, though you may  need a couple extra sizes).

Conclusion

So, in terms of tools, crochet is pretty good.  Only need a small set of crochet hooks, maybe some shared notions like a stitch marker and/or row counter, and you're set.  Knitting requires way more tools and notions, and that costs money.  Also, due to the way you use knitting needles, quality becomes a lot more important, also upping the cost.  In conclusion, if you're really broke and don't already knit or crochet, learn how to crochet.  Or stick to one area of knitting, so you don't need as many tools.  Or find a knitting friend that will loan you stuff.  They all work. If you're not broke, then just be prepared to spend a lot building up your tool stash if you're learning to knit.  Or ignore how much money you're spending on your hobby.  Either way works.

October 20, 2011

Magic Looping is a Good Hack

I hate DPNs (Double Pointed Needles, for the uninitiated).

Yeah, I said it.  I have never liked working on DPNs.  It's not knitting in the round that I hate; I love doing that.  As long as it's on a long circular needle, that is.  But I dread the point in my sweaters and hats where I have to pull out those crazy pointed things that stick out everywhere, catch on everything, and are a pain in the ass to knit on since you're constantly stopping to adjust the needles, move stitches, and on and on.

They also don't stop anyone from choosing to sit next to me on the bus, even when there's an empty row right in front of me.  But I digress.

This isn't to say I don't use them.  Not to say I haven't used them successfully either. But I don't like them, and more times than not, something ends up looking screwy.

Anyway, what brought it to a head this week was this:


Now, we already know I suck at 1x1 ribbing, but this is a new low.  Everywhere the needles meet, there's a big open gap between the purl and knit stitches.  If you look closely, you can see where I tried the rotating trick (rotating where the joins are is supposed to help hide the ladders, as they aren't lined up in a column.  Maybe for someone else it does, oye.).  To put salt in the wound, this is all I got done in three days of bus trips (though part of that is due to bus crowding and falling asleep on the bus...lets say this is all I got done in 4 bus trips).  3 inches of ribbing.  That's it.

It is now gone.  I got sick of all the gaps and curving ribbing. I ripped it out Wednesday night.  I then sat down and looked up a video on how to magic loop.

I now have this:


Look at it!  3 and a half inches of nice, neat, ribbing; the best 1x1 ribbing I've done so far.  And it was done in two bus trips.  No ladders.  No pointy needles clacking everywhere.  Why didn't I learn how to magic loop before?  Why did I buy every DPN from size 0 to 11 from KnitPicks when I had perfectly good needles and a long cable to knit small rounds?

I can tell you why, actually.  I bought most of the DPNs before I knew there were other ways of knitting small rounds.  And when I did learn of magic looping, most of what I was reading was along the lines of 'Why would you do that?  DPNs are superior.'  I got the idea that magic looping was a Bad Idea, a bad hack.  So I didn't go any further, and I bought more DPNs.

Well, magic looping may be a hack (after all, you are using a circular needle for something it really wasn't meant to be used for), but it's a very good one, at least for me.  I can knit faster, it works up neater, and I'm dealing with less needles.

It serves me right for ignoring the solution and wasting my time.  I shouldn't have cared.  When have I not liked a good hack?  It's like finding out that adding two lines to a stored procedure will make Microsoft Report Viewer generate columns using a stored procedure with a temporary table in it.  No, not my hack, but finding it did save my ass from having to completely destroy someone else's sproc to get rid of the temporary tables that shouldn't have been an issue in the first place (and, for the record, Microsoft Report Viewer is something else I hate.  But that's not knitting related, so I'll drop it).

Oh, and before I go, I guess I should clarify how I usually use the term hack.  A hack is a solution to a problem that doesn't actually fix the problem.  Instead, it works around the problem, and is often not pretty, efficient, or smart, but it works.  If I say I hacked something in my knitting, I usually mean I fixed my knitting mistake by doing something else instead of frogging it back and doing it right.  For example, fixing too many stitches increased by knitting two together on the next row.  That's a hack. Sometimes this is a good thing (who's going to notice an extra increase and decrease in the area under your armpits?).  Sometimes, it isn't, because the problem still exists and leaving it there or even the hack itself can cause other issues (that area where you had extra increase may now be too big, and will sag, making it noticeable anyway).

And by googling the word hack, I just found out the other word for it is kludge.  Anyone else ever hear that word used?  Kludge? Maybe it's because I'm a programmer, but I've always heard it called a hack.  Link here if you're interested.

October 9, 2011

Ribbing Woes

I have realized that I suck at 1x1 ribbing. I should have noticed this when I did it at the bottom of the sweater:

I should have thought, hey, this isn't good, I need to learn to fix this.  But no, I conveniently forgot that the bust area of the Milk Maiden sweater is 1x1 ribbing as well.  And when I actually got to that part of the pattern, I forgot that my 1x1 ribbing sucks. So I began ribbing, only to find out that, yeah, having gaping stitches is not conducive to the bust area of a sweater.

So I pulled out 6 rows, and tried again.  I tried twisting the rib, but that just creates huge gaping holes in between the stitches.  I tried twisting the knit stitches only, but that leaves gaping purl stitches.  I tried loosing my tension (this seems counter-intuitive, but according to what I read, trying to pull your stitches tighter makes gaping ribbing worse), but it didn't work either.  I've pulled this part of the sweater out three times already, and I've made no progress since Tuesday (though crowded buses and the idiot that sat next to me with a huge duffel bag in his lap that took up half my seat space didn't help either).

Now I just don't know what to do, other than change it to a 2x2 rib, since I magically don't have this issue when I do any other multiple of ribbing. It'll also mean the bottom won't match, which I'm fine with.  As long as I do the sleeves the same way, I think it'll work.  But I rather do it right.  How the hell do I do 1x1 ribbing without gaping holes?

September 24, 2011

Obligatory First Post, or How I Learned to Compile Yarn

The obligatory first post of every craft blogger (in my opinion at least) is how exactly you ended up so obsessed with this stuff anyway.  Knitting?  Crocheting?  Don't you have better things to do with your time, like playing Angry Birds on your smartphone?  Isn't that the obligatory bus activity after sleeping?

Well, other than the fact that I currently don't own a smartphone, the answer is that I like making things.  I like making things in ways that only annoy me sometimes.  I like getting to the end of the day, a day where everything could be going to hell, and being able to say: 'Well, I spent my whole day trying to get this program to work and it still doesn't work, but I got part of this sweater done, so I'm not completely useless.' I also like being able to do something during my commute which has tangible results, and keeps me from falling asleep (I don't care how interesting a book can be, when you get up at 4 in the morning, you'll still fall asleep.  If I fall asleep knitting, then there's no hope that day.  Falling asleep on the bus results in more headaches than not for me).

The second part of this is, of course, how did I learn?  Well, my mother taught me to crochet when I was in 2nd grade, and since then I've picked it up on and off depending on if I was motivated enough.  I got good enough to start making up my own crochet patterns when I was in high school.  Crochet kippot, mainly.  I then dropped it all in college, more or less, making only a scarf for a roommate during that time.

When I graduated and started working full time, I found myself back home with nothing much to do, and more time to do things.  Needing a hat and scarf to wear to work, I picked up my crochet hook again and BS'ed a hat and scarf set.  I then set out to prove I could do something bigger, found a afghan pattern I liked, and completed it (that afghan is the Demented Squares Afghan, by the way).  From then on, I always had a project going, though I didn't devote much time to them.  Part of the reason is that I never found crochet patterns I loved, and I wasn't good enough to make anything amazing on my own.  My mom also scared me away from making wearables, as she has trouble with them, though I started getting over that.

Then, one weekend, my mom decided that she would try to learn how to knit.  I decided that I would try to learn with her.  We went out, bought a learn-to-knit book, needles, and yarn.  My mom ended up getting frustrated and dropped it.  I, however, learned to knit.  (In a completely unplanned step, so did my youngest sister, who never got the hang of crochet and so had spent much time ignoring yarn crafts (she, however, cross-stitches amazingly well.  It's a craft I wouldn't touch with a ten-foot pole.  I hate sewing and anything like it)).

I then learned that despite spending all that time wondering why the hell someone would do a craft that involved more than one active loop at at time, I loved to knit.  It made a fabric I liked the look of better and that worked much better for wearables.  There were tons of patterns out there than I liked, and I then found Raverly.  Enough said. It was new to me, and I was motivated.  I also learned to knit just at the time I was looking into getting more into crocheting, and it took me right off that track and applied my motivation to another one.

So now it's a little over a year later, and I now mostly knit.  I still crochet, and I think there are still some things that are better crocheted (another topic for another day).  Its all gotten me though hard times at work, gave me gifts to give people, gave me something that I could do on the bus and stay awake, and let me get shirts that actually fit (when I do it right, of course).

And now I should go to bed.  To come, I'll cover some of the issues I had learning to knit, talk about some of my thoughts on both crafts and where I stand with them, as well as mention why I named the blog what I did (it's more embarrassing than exciting, so don't get your hopes up).

'Night.